What Can You Build?
Connect Kit gets a talking 3D avatar on screen in under 15 minutes — and gives you a full platform to extend it as far as you need. Here is what is available today and what is on the roadmap.
Everything you need for a lifelike avatar experience — ready to deploy the moment you pick your configuration.
Avatar Catalog
Curated cast of realistic humans, cartoon characters, and VRM avatars. Pick one from the catalog and it's on-screen in minutes.
Voice — Azure & Google TTS
Rich, human-sounding voices from Azure and Google TTS. Speech automatically drives the avatar's lip-sync — no extra setup required.
Chatbot
Upload a knowledge file, wire simple tool calls, and pair with the 3D Avatar for a fully voiced AI agent — no extra backend required.
Built to Run Everywhere
Focus on building your product — we handle the rest. All features run reliably on Chrome, Safari, and Edge across desktop and mobile with no platform workarounds needed.
Bring Your Own LLM
Use any LLM. Embed motion cues inline via Markup Motion Language so the avatar's body language matches the conversation.
Bring Your Own Voice
Pass your own audio (an ArrayBuffer from any
TTS service or pre-recorded clip) directly via
presenter.presentWithAudio(). The avatar
lip-syncs to your audio and the Motion Director still
drives gestures and expressions from the text — no Perxona
TTS required.
Bring Your Own Avatar (VRM 1.0)
Upload a VRM 1.0 character to match your brand or audience and make it speak. Uploading is on hold for now — see VRM Uploader.
Real-time avatar performances that stream instantly — no large
file downloads, no video buffering, no game-engine install.
The avatar responds the moment you call
present().
In-house Motion Director
The engine reads the text and selects matching body motion and facial expressions automatically — the avatar's face and body react to what it's saying.
Be your own Motion Director
Override motion timing at the sentence level using Markup Motion Language — full creative control in plain text.
// Presentation Engine — available now
const presenter = document.querySelector("sv-presenter");

button.addEventListener("click", async () => {
  await presenter.resumeAudioPlayback();
  await presenter.initializeWithConnectKey(connectKey, { avatarId, sceneId, voiceId });
  presenter.present("Hello world! I'm Perxona agent and I can talk to you.");
});你能用 Connect Kit 做什麼?
不到 15 分鐘,一個會說話的 3D 虛擬人就能上線——還有完整的平台供你持續擴展。以下是現在可用的功能,以及即將推出的能力。
打造生動虛擬人體驗所需的一切——選好設定,立即上線。
Avatar 目錄
精選的寫實人物、卡通風格、VRM 角色,從目錄挑選一個,幾分鐘內就在螢幕上。
語音 — Azure & Google TTS
來自 Azure 與 Google TTS 的豐富真人語音。語音自動驅動角色的口型同步(Lip-sync)——無需額外設定。
Chatbot
上傳 knowledge file、設定簡單的 tool call,搭配 3D Avatar 打造全語音 AI 代理——不需要自建後端。
隨處穩定運作
你只需專注在打造自己的產品,其餘的我們來處理。所有功能穩定運作在 Chrome、Safari、Edge 的桌機與手機上,無需任何平台相容性處理。
接入你的 LLM
使用任何 LLM。透過 Markup Motion Language 在對話文字中內嵌動作指令,讓角色肢體語言與對話同步。
接入你的語音
透過
presenter.presentWithAudio()
直接傳入自己的音訊(任何 TTS 服務或預錄音檔的
ArrayBuffer)。 Avatar 對你的音訊做
口型同步,Motion Director
仍根據文字驅動肢體動作與表情——不需要 Perxona TTS。
接入你的 Avatar(VRM 1.0)
上傳 VRM 1.0 角色,讓你的產品更貼近你的品牌與客戶需求。目前暫停上傳,詳見 VRM Uploader。
即時串流的角色表演——不用像影片串流或遊戲引擎一樣事先下載大型檔案。呼叫
present() 的瞬間,角色立即回應。
內建 Motion Director
引擎讀取文字語意,自動挑選最合適的肢體動作與臉部表情——角色的表情和動作會配合說話內容即時反應。
自訂 Motion Director
透過 Markup Motion Language 在句子層級自訂動作時間點——用純文字就能完全掌控角色表演。
// 表演引擎 — 現在就可以用
const presenter = document.querySelector("sv-presenter");

button.addEventListener("click", async () => {
  await presenter.resumeAudioPlayback();
  await presenter.initializeWithConnectKey(connectKey, { avatarId, sceneId, voiceId });
  presenter.present("我想要吃早餐。");
});Connect Kit で何が作れる?
15 分以内にしゃべる 3D アバターをオンラインにできます——さらに必要なだけ拡張できるプラットフォームも揃っています。現在利用可能な機能と近日公開予定の機能をご紹介します。
リアルなアバター体験に必要なすべてが揃っています——設定を選ぶだけですぐにデプロイできます。
アバターカタログ
リアル系・カートゥーン系・VRM キャラの厳選キャスト。カタログから選ぶだけで数分で画面に登場します。
音声 — Azure & Google TTS
Azure と Google TTS のリアルな人声。音声がアバターのリップシンクを自動駆動——追加設定は不要です。
チャットボット
ナレッジファイルをアップロードし、シンプルなツールコールを設定して 3D アバターと組み合わせると、フルボイスの AI エージェントが完成——バックエンド不要。
どこでも安定動作
開発者は自分のプロダクト作りに集中するだけ。すべての機能が Chrome・Safari・Edge のデスクトップ/モバイルで安定して動作し、プラットフォームごとの対応は不要です。
独自 LLM を接続
任意の LLM が使えます。Markup Motion Language でモーションキューをテキスト中に埋め込み、会話とアバターの動きを同期させます。
独自音声を使用
presenter.presentWithAudio() に任意の TTS
サービスや録音済み音声の
ArrayBuffer
を直接渡すだけ。アバターがリップシンクし、 Motion Director
がテキストから動きと表情を自動生成します——Perxona TTS
は不要です。
独自アバター(VRM 1.0)
VRM 1.0 キャラをアップロードして、ブランドや顧客に合ったアバターで話させることができます。現在アップロードは一時停止中です。詳しくは VRM アップローダーをご覧ください。
リアルタイムのアバターパフォーマンスを即座にストリーミング——動画バッファリングもゲームエンジンのインストールも不要。present()
を呼んだ瞬間にアバターが応答します。
インハウス Motion Director
エンジンがテキストの意味を読み取り、最適なボディモーションと表情を自動選択——アバターの顔と体が発話内容に合わせてリアルタイムに反応します。
カスタム Motion Director
Markup Motion Language を使って文単位でモーションのタイミングを制御——プレーンテキストで完全な演出が可能です。
// プレゼンテーションエンジン — 今すぐ使えます
const presenter = document.querySelector("sv-presenter");

button.addEventListener("click", async () => {
  await presenter.resumeAudioPlayback();
  await presenter.initializeWithConnectKey(connectKey, { avatarId, sceneId, voiceId });
  presenter.present("朝ごはんが食べたいです。");
});Perxona Connect Kit
Build a browser-native avatar experience.
The public integration surface for the
Perxona Connect API and the
<sv-presenter> avatar Web Component. This
handbook explains those contracts first; the Express sample
appears later as one implementation path.
Perxona Connect API 與
<sv-presenter> Avatar Web Component
的公開整合介面。本手冊先說明這兩個契約;後半部的 Express
範例則展示其中一種實作方式。
Perxona Connect API と
<sv-presenter> アバター Web
コンポーネントの公開統合面です。このハンドブックではまず両方の
契約を説明し、後半の Express
サンプルで実装方法の一例を示します。
What is Perxona Connect Kit?
Connect Kit is the public integration surface for placing a real-time 3D avatar in a web product. It separates the browser rendering contract from the server-facing Connect API, so you can use either with your own application architecture.
It has two complementary parts:
-
<sv-presenter>— a browser Web Component that renders the avatar, initializes a selected avatar/scene/voice target, and runs speech, motion, and lip-sync playback. -
Connect API — authenticated HTTP endpoints
for catalog assets, voices, presentations, and chatbots.
Authenticate with a Connect API key, sent as
an
X-Connect-Keyheader. Keys come in two types: a secret key stays on your server, and a publishable key is the one you hand to the browser — it can read your catalog, generate presentations, and mint speech tokens, and nothing beyond that.
什麼是 Perxona Connect Kit?
Connect Kit 是將即時 3D Avatar 加入網頁產品的公開整合介面。它將 瀏覽器的渲染契約與伺服器端的 Connect API 分開,因此可依照自己的 應用程式架構使用兩者。
Avatar 指的是同一個角色資源。為了與
Avatar 下拉選單、API 欄位及程式碼保持一致,這些技術名稱會維持
英文 Avatar。
它由兩個互補的部分組成:
-
<sv-presenter>— 在瀏覽器中 渲染 Avatar 的 Web Component,負責初始化指定的 Avatar/Scene/Voice,並執行語音、動作與口型同步播放。 -
Connect API — 提供 catalog asset、voice、
presentation 與 chatbot 的驗證 HTTP 端點。以
Connect API 金鑰驗證,透過
X-Connect-Keyheader 送出。金鑰分兩種:secret 留在你的伺服器,publishable 才是交給瀏覽器的那把——它能讀取 catalog、產生 presentation、發放語音 token,除此之外沒有更多。
Perxona Connect Kit とは?
Connect Kit は、リアルタイム 3D アバターを Web プロダクトに組み込むための公開統合面です。ブラウザのレンダリング契約と サーバー側の Connect API を分離しているため、自分のアプリケーション アーキテクチャに合わせて利用できます。
相補的な 2 つの部分で構成されます:
-
<sv-presenter>— ブラウザで アバターを描画する Web Component。選択した Avatar/Scene/Voice を初期化し、音声・モーション・リップシンク再生を実行します。 -
Connect API — カタログ asset、voice、
presentation、chatbot のための認証済み HTTP エンドポイント。
Connect API キーで認証し、
X-Connect-Keyヘッダーとして送ります。キーは 2 種類:secret はサーバーに留め、publishable がブラウザに渡す方です——カタログの読み取りと presentation の生成、音声トークンの発行ができ、それ以上はできません。
Integration Architecture
A Connect integration has three responsibilities. Your backend
owns credentials and access policy, the Connect API owns the
avatar resources and presentation services, and
<sv-presenter> owns browser-side rendering
and playback.
Your backend                          Browser
- stores Connect credentials          - renders your product UI
- attaches its secret key             - receives the publishable key
            |                         |
            v                         v
      Connect API  <----------------  <sv-presenter>
      assets · voices · presentation  initializes · speaks · animates
      chatbots                        handles lip-sync and playback
Responsibility Boundary
- Your backend holds the secret Connect API key, applies your own user authorization, and serves the browser the publishable key — never the secret one.
- Connect API exposes the catalog of avatars, scenes, voices, and motions, plus presentation and chatbot operations.
-
<sv-presenter>receives the publishable key and selected asset IDs, then communicates with Connect directly for the runtime services it needs.
Runtime Flow
-
Your backend sends its secret key as an
X-Connect-Keyheader on every Connect request. There is no login step and no token to refresh. - Your application lists or selects an active avatar, scene, and optional voice from the Connect API.
-
In a direct user gesture, call
presenter.resumeAudioPlayback()to satisfy the browser autoplay policy. -
Call
presenter.initializeWithConnectKey(connectKey, { avatarId,
                    sceneId, voiceId })
. -
When the component reports
Ready, callpresenter.present(content)orpresenter.presentWithAudio(audio, content).
Origin header. It does not stop someone who
copies the raw key into their own script:
Origin is just a header, and nothing outside a
browser is bound to send a truthful one. If a key leaks,
revoking it from the console is the actual stop. A
secret key adds everything a server needs:
writing assets, talking to your chatbots, and creating,
editing and deleting them. Keep it on your server and never
serve it on any route.
pxc_ prefix and the upstream
accepts either, so a secret key in
PERXONA_CONNECT_PUBLISHABLE_KEY does not fail —
everything works, and every visitor is handed a key that can
manage your chatbots. The console is the only place that tells
you which type a key is.
Origin header, and a server-to-server request
never sends one — so a secret key with domains configured is
refused on every call — and the error says only that the
origin is not allowed, never what it saw, because nothing was
sent. Domain restrictions belong on the publishable key, which
really is used by a browser.
整合架構
一個 Connect 整合有三種責任:後端負責憑證與存取政策,Connect API
負責 Avatar 資源與 presentation 服務,而
<sv-presenter> 負責瀏覽器端渲染與播放。
你的後端                              瀏覽器
- 保存 Connect 憑證                   - 渲染產品 UI
- 每次呼叫都帶著 secret 金鑰          - 接收 publishable 金鑰
            |                         |
            v                         v
      Connect API  <----------------  <sv-presenter>
      asset · voice · presentation    初始化 · 發話 · 動畫
      chatbot                         處理口型同步與播放
責任邊界
- 你的後端持有 secret Connect API 金鑰,套用自己的使用者授權規則,並提供瀏覽器 publishable 金鑰——絕不是 secret 那把。
- Connect API 提供 Avatar、Scene、Voice、Motion catalog,以及 presentation 與 chatbot 操作。
-
<sv-presenter>接收 publishable 金鑰與選定 asset ID,然後直接與 Connect 溝通取得執行時所需服務。
執行流程
-
後端在每個 Connect 請求帶上自己的
secret 金鑰作為
X-Connect-Keyheader。沒有登入步驟,也沒有需要刷新的 token。 - 應用程式從 Connect API 列出或選擇啟用中的 Avatar、Scene 與選填 Voice。
-
在直接的使用者手勢中呼叫
presenter.resumeAudioPlayback(),以符合瀏覽器的自動播放政策。 -
呼叫
presenter.initializeWithConnectKey(connectKey, { avatarId,
                    sceneId, voiceId })
。 -
元件回報
Ready後,呼叫presenter.present(content)或presenter.presentWithAudio(audio, content)。
Origin
header。但這擋不住有人把金鑰原封不動抄進自己寫的腳本:Origin
只是一個
header,瀏覽器以外的東西沒有義務誠實填它。金鑰一旦外流,真正能止血的是到
console 撤銷它。secret
金鑰則在此之上額外具備伺服器需要的一切:寫入 asset、對你的
chatbot
說話,以及建立、修改、刪除它們。請留在伺服器上,不要在任何路由上提供它。
pxc_ 前綴,上游兩種都接受,所以把 secret 金鑰放進
PERXONA_CONNECT_PUBLISHABLE_KEY
不會失敗——一切照常運作,而每一位訪客都拿到一把能管理你 chatbot
的金鑰。只有 console 會告訴你某把金鑰是哪一種。
Origin
header,而伺服器對伺服器的請求根本不會送出它——所以設了網域限制的
secret 金鑰會在每一次呼叫都被拒絕——而錯誤訊息只會說 origin
不被允許,不會告訴你它看到的是什麼,因為根本沒有東西被送出。網域限制屬於真的會被瀏覽器使用的
publishable 金鑰。
統合アーキテクチャ
Connect 統合には 3 つの責務があります。バックエンドが認証情報と
アクセスポリシーを担い、Connect API がアバターリソースと
presentation サービスを担い、<sv-presenter>
が ブラウザ側の描画と再生を担います。
あなたのバックエンド                  ブラウザ
- Connect 認証情報を保存              - プロダクト UI を描画
- 毎回 secret キーを送信              - publishable キーを受信
            |                         |
            v                         v
      Connect API  <----------------  <sv-presenter>
      asset · voice · presentation    初期化 · 発話 · アニメーション
      chatbot                         リップシンクと再生を処理
責務の境界
- あなたのバックエンドが secret の Connect API キーを保持し、自身のユーザー認可を適用して、ブラウザには publishable キーを渡します——secret キーは決して渡しません。
- Connect API は Avatar、Scene、Voice、Motion の catalog と、presentation、chatbot 操作を提供します。
-
<sv-presenter>は publishable キーと選択した asset ID を受け取り、実行時に必要なサービスのため Connect と直接通信します。
実行フロー
-
バックエンドがすべての Connect リクエストに自身の
secret キーを
X-Connect-Keyヘッダーとして付けます。ログイン手順も、更新すべきトークンもありません。 - アプリケーションが Connect API から有効な Avatar、Scene、任意の Voice を一覧または選択します。
-
直接のユーザージェスチャー内で
presenter.resumeAudioPlayback()を呼び、ブラウザの 自動再生ポリシーを満たします。 -
presenter.initializeWithConnectKey(connectKey, { avatarId,
                    sceneId, voiceId })
を呼びます。 -
コンポーネントが
Readyを報告したら、presenter.present(content)またはpresenter.presentWithAudio(audio, content)を呼びます。
Origin
ヘッダーを送るからです。ただしこれは、生のキーを自分のスクリプトにそのままコピーした相手は防げません:Origin
は単なるヘッダーであり、ブラウザ以外に正直に送る義務はありません。キーが漏れた場合、実際に止血できるのはコンソールでの失効だけです。secret
キーはサーバーに必要なものをすべて追加します:asset
の書き込み、chatbot との会話、その作成・編集・削除。サーバーに
置き、どのルートでも配信しないでください。
pxc_
接頭辞を共有し、上流はどちらも受け付けます。secret キーを
PERXONA_CONNECT_PUBLISHABLE_KEY
に入れても失敗しません——すべて正常に動き、訪問者全員が chatbot
を管理できるキーを受け取ります。どちらの型かを教えてくれるのはコンソールだけです。
Origin
ヘッダーと照合されますが、サーバー間リクエストはそれを送りません——そのため、ドメインを設定した
secret キーはすべての呼び出しで拒否されます——そしてエラーは
origin
が許可されていないとしか言わず、何を見たかは伝えません。何も送られていないからです。ドメイン制限は、実際にブラウザが使う
publishable キーのためのものです。
Presenter Component Reference
<sv-presenter> is the browser runtime for a
Connect avatar. Load the approved Presenter module, add the
element to the DOM, then interact with its JavaScript API. The
component accepts a publishable Connect API key and selected
asset IDs; your application backend owns how it supplies those
values.
Load the Component
Read PRESENTER_URL from trusted application
configuration supplied by your server or Perxona, then inject it
once as a module script. The URL is not a credential.
Presenter 元件參考
<sv-presenter> 是 Connect Avatar
的瀏覽器端執行期。 載入核准的 Presenter module、將元素加入
DOM,然後透過其 JavaScript API 操作。元件接收 publishable
Connect API 金鑰與選定 asset ID;這些值如何
由應用程式後端提供,則由你的架構決定。
載入元件
從伺服器或 Perxona 提供的可信任應用程式設定讀取
PRESENTER_URL,然後僅注入一次 module script。這個
URL 不是憑證。
Presenter コンポーネントリファレンス
<sv-presenter> は Connect Avatar
のブラウザ実行時 コンポーネントです。承認済みの Presenter module
を読み込み、要素を DOM に追加してから JavaScript API
で操作します。コンポーネントは publishable な Connect API
キーと選択した asset ID を受け取り、それらをどう提供するかは
あなたのアプリケーションバックエンドが担います。
コンポーネントを読み込む
サーバーまたは Perxona
が提供する信頼済みアプリケーション設定から
PRESENTER_URL を読み、module script として一度だけ
注入します。この URL は認証情報ではありません。
<!-- Declare the element before the Presenter module finishes loading -->
<sv-presenter hidden></sv-presenter>// Read this from trusted application configuration; it is not a secret.
const presenterUrl = getPresenterUrlFromAppConfig();
// Load the Presenter module once before reading the custom element.
await new Promise((resolve, reject) => {
const script = document.createElement('script');
script.type = 'module';
script.src = presenterUrl;
script.onload = resolve;
script.onerror = () => reject(new Error('Presenter engine failed to load'));
document.head.append(script);
});
const presenter = document.querySelector('sv-presenter');Full Initialization Flow
完整初始化流程
完全な初期化フロー
// Your backend serves the publishable key. It never serves the secret one.
const getConnectKeyFromYourBackend = async () => {
  const response = await fetch('/your-backend/connect-key');
  return response.json();
};

// Listen for state changes before launching the component.
presenter.addEventListener('PRESENTER_STATUS', (e) => {
  // e.detail.status: 'Uninitialized' | 'Initializing' | 'Ready'
  console.log('Presenter status:', e.detail.status);
});

launchButton.addEventListener('click', async () => {
  // Must run inside a direct user gesture to unlock autoplay.
  await presenter.resumeAudioPlayback();

  const { connectKey } = await getConnectKeyFromYourBackend();
  await presenter.initializeWithConnectKey(connectKey, {
    avatarId: selectedAvatarId,
    sceneId: selectedSceneId,
    voiceId: selectedVoiceId, // optional
  });

  // present() never rejects; inspect the returned result instead.
  const result = await presenter.present('Hello from Perxona!');
  if (!result.success) console.warn(result.code, result.message);
});

// A refused key has no refresh to fall back on: it is revoked, expired,
// restricted to other domains, or was never granted the scope, and
// presenting it again fails the same way.
presenter.addEventListener('CONNECT_KEY_REJECTED', () => {
  console.error('Connect key rejected — reissue it in the console, then launch again.');
});

// Stop current playback and clear the queue when your UI needs it.
presenter.interruptPresentation();
API Members
API 成員
API メンバー
| Member | Description說明説明 |
|---|---|
initializeWithConnectKey(connectKey, target)
|
Boot the presenter. Resolves
target (avatarId/sceneId/voiceId) against
the Connect API and mints a speech token. Returns a
Promise — awaiting it means the presenter is
ready.
啟動 presenter。將
target(avatarId/sceneId/voiceId)解析至
Connect API 並發放語音 token。回傳 Promise——await 後表示
presenter 已就緒。
Presenter
を起動します。target(avatarId/sceneId/voiceId)を
Connect API
に解決してスピーチトークンを発行します。Promise
を返します——await 後に Presenter
が準備完了となります。
|
resumeAudioPlayback() |
Unlock browser autoplay policy.
Must be called from a direct user gesture.
Returns a Promise. Call this before
initializeWithConnectKey() in your click
handler.
解鎖瀏覽器自動播放限制。必須從直接的使用者手勢呼叫。回傳
Promise。在點擊處理器中於
initializeWithConnectKey()
之前呼叫此函式。
ブラウザの自動再生ポリシーをアンロックします。直接のユーザージェスチャーから呼び出す必要があります。Promise
を返します。クリックハンドラー内で
initializeWithConnectKey()
の前に呼び出してください。
|
present(content) |
Synthesize content into speech and play it
on the avatar. Returns
PresentationResult { success: boolean, code: string,
                          message?: string }
. Never rejects — always check
result.success.
將 content 合成為語音並在 avatar
上播放。回傳
PresentationResult { success: boolean, code: string,
message?: string }。永不 reject——始終檢查
result.success。
content
を音声に合成してアバターで再生します。PresentationResult { success: boolean, code: string,
message?: string }
を返します。reject しません——常に
result.success を確認してください。
|
presentWithAudio(audio, content) |
Play caller-supplied audio on the avatar, bypassing
Perxona TTS. Pass an ArrayBuffer from any
TTS service or pre-recorded clip. The Motion Director
still runs — gestures and expressions are driven by
content. Returns
PresentationResult.
Never rejects.
直接在 Avatar 上播放自訂音訊,略過 Perxona
TTS。傳入任何 TTS 服務或預錄音檔的
ArrayBuffer。Motion Director 仍根據
content 驅動肢體動作與表情。回傳
PresentationResult。永不 reject。
Perxona TTS
を使わず、独自音声をアバターで直接再生します。任意の TTS
または録音済み音声の
ArrayBuffer を渡してください。Motion
Director は
content
に基づき動きと表情を自動生成します。PresentationResult
を返します。reject しません。
|
interruptPresentation() |
Stop the current performance and clear the queue immediately. 立即停止當前演出並清空佇列。 現在のパフォーマンスを停止してキューを即座にクリアします。 |
event PRESENTER_STATUS |
Fired as state changes. e.detail.status:
"Uninitialized" →
"Initializing" →
"Ready".
狀態改變時觸發。e.detail.status:"Uninitialized"
→ "Initializing" →
"Ready"。
状態変化時に発行されます。e.detail.status:"Uninitialized"
→ "Initializing" →
"Ready"。
|
event CONNECT_KEY_REJECTED |
Fired when the Connect API refuses the key: revoked, expired, restricted to other domains, or never granted the scope. There is nothing to retry — the same key fails the same way. Reissue it in the console, then initialize again. 當 Connect API 拒絕金鑰時觸發:已撤銷、已過期、限定了其他網域,或從未被授予該權限。沒有東西可以重試——同一把金鑰會以同樣方式失敗。請到 console 重新建立,再初始化一次。 Connect API が鍵を拒否した時に発行されます:失効済み、期限切れ、他ドメインに限定、またはそのスコープが付与されていない。リトライできるものはありません——同じ鍵は同じように失敗します。コンソールで再発行してから、もう一度初期化してください。 |
Transparent Background
When the scene you initialize with carries the
background:transparent tag, the presenter renders
the 3D view on a transparent canvas and your page shows through
behind the avatar; a scene without the tag renders its own
built-in background instead, and nothing shows through.
The scene decides it: there is no method and no attribute that
switches transparency on, so whether you get it follows from
which sceneId you pass to
initializeWithConnectKey. Both
/assets/scenes and
/assets/scenes/{scene_id} return each scene's
tags, so your picker can tell which scenes are
transparent. When you pick one of those, whatever should show
behind the avatar belongs on the element's own container — the
presenter paints no background of its own.
透明背景
若你初始化時指定的 scene 帶有
background:transparent tag,presenter 會把 3D
視圖繪製在透明畫布上,讓你的頁面從 avatar 背後透出來;沒有這個
tag 的 scene 則會畫出場景本身自帶的背景,頁面就透不出來。
決定權在
scene:沒有任何方法或屬性可以開啟透明背景,要不要透明,取決於你傳給
initializeWithConnectKey 的
sceneId。/assets/scenes 與
/assets/scenes/{scene_id} 都會回傳每個 scene 的
tags,所以你的選單可以據此分辨哪些 scene
是透明背景。選到這種 scene 時,想顯示在 avatar
背後的內容就放在元件本身所在的容器上——presenter
自己不會繪製任何背景。
透明背景
初期化に使う scene に
background:transparent
タグが付いている場合、Presenter は 3D
ビューを透明なキャンバスに描画するので、アバターの背後にページが透けて見えます。タグが付いていない
scene では、その scene
自身の背景が描画され、ページは透けません。
決めるのは scene
です。透明背景を有効にするメソッドや属性は存在しないため、透明にするかどうかは、どの
sceneId を
initializeWithConnectKey
に渡すかで決まります。/assets/scenes と
/assets/scenes/{scene_id} はどちらも各 scene の
tags を返すので、どの scene
が透明背景かはピッカー側で判別できます。その scene
を選んだときにアバターの背後に表示したいものは、要素自身のコンテナに配置してください——Presenter
自身は背景を一切描画しません。
Connect API Reference
Connect API is the server-facing half of the kit. Unless noted
otherwise, the paths below are relative to your regional base
URL, for example
https://console.perxona.ai/asia/api/v1/connect.
Authenticate protected calls with a Connect API key, sent as an
X-Connect-Key header.
Connect API 參考
Connect API 是 Connect Kit
的伺服器端整合介面。除非另有說明,以下路徑皆相對於 區域 base
URL,例如
https://console.perxona.ai/asia/api/v1/connect。
受保護的呼叫以 Connect API 金鑰驗證,透過
X-Connect-Key header 送出。
Connect API リファレンス
Connect API は Connect Kit
のサーバー側統合面です。特記がない限り、以下の
パスはリージョンの base URL(例:
https://console.perxona.ai/asia/api/v1/connect)からの相対パスです。 保護された呼び出しには Connect API
キーを X-Connect-Key ヘッダーとして使用します。
console.perxona.ai. The
Express sample later in this handbook wraps some of these
endpoints behind its own /api/* routes, on a
second, separate server — see
Express Sample Adapter API
for those. If you are writing your own backend, call the
endpoints on this page directly; you do not need the sample's
routes.
這裡是真正的 Connect API——你自己的後端要呼叫的那個,位於
console.perxona.ai。本手冊後面的 Express
範例把其中一部分端點包在自己的
/api/*
路由後面,那是另一台獨立的伺服器——見Express 範例 Adapter API。若你在寫自己的後端,請直接呼叫這頁上的端點;不需要範例的那組路由。
これが本物の Connect API です——あなた自身のバックエンドが呼び出す、console.perxona.ai
上のものです。このハンドブック後半の Express
サンプルは、これらのエンドポイントの一部を自身の
/api/*
ルートの背後にラップしています。それは別の、独立したサーバーです——Express サンプル Adapter API
を参照してください。自分のバックエンドを書く場合は、このページのエンドポイントを直接呼び出してください。サンプルのルートは不要です。
X-Connect-Key: <your key> on every
protected call — see
Get Your API Credentials for how to
create one.
每個受保護的呼叫都送
X-Connect-Key: <你的金鑰>——如何建立見取得 API 憑證。
保護された呼び出しには毎回
X-Connect-Key: <あなたのキー>
を送ってください——作成方法はAPI 認証情報を取得を参照。
X-Connect-Key and
Authorization: Bearer together with
400, whether you are migrating off the legacy
header or testing both.
絕不可在同一個請求同時送出兩種 header。不論是正在從舊版 header 遷移、還是同時測試兩者,API 都會以
400 拒絕同時帶著 X-Connect-Key 與
Authorization: Bearer 的請求。
1
つのリクエストで両方のヘッダーを送らないでください。レガシーヘッダーから移行中でも、両方を試している最中でも、API
は X-Connect-Key と
Authorization: Bearer
を同時に含むリクエストを 400 で拒否します。
Usage and Subscription 用量與訂閱 利用量とサブスクリプション
Connect Kit sign-ups are treated as Perxona Console
Free Plan users by default. If that
organization's credits are exhausted,
or its subscription itself is no longer active, metered calls — currently
POST /api/chatbots/:id/chat (chatbot
conversations) — fail with the same HTTP
400 and code: 1003, with a body
like one of these:
{"code": 1003, "details": "credit_points exhausted for org_id: ..."}{"code": 1003, "details": "Subscription status is not valid for org_id: ..."}
The details field is what tells the two apart.
A third, separate case — no subscription record exists for
the organization at all — fails with HTTP
403 and code: 14005 instead:
{"code": 14005, "details": "No active subscription found for org_id: ..."}Non-metered calls (catalog lookups, chatbot CRUD, presentation) are not affected.
To check your current usage or top up credits, sign in to
Perxona Console → Subscription
(use the region matching your account). If you are building
your own app on top of the Connect API, consider detecting
code: 1003 and code: 14005 in the
response and showing your users a friendly message — the
sample demos in this kit show this pattern for
1003; the same approach applies to
14005.
Connect Kit 註冊使用者原則上會被視為 Perxona Console 的
Free Plan 使用者。若組織 credits
用量耗盡,或訂閱本身已經失效,計量型呼叫——目前是
POST /api/chatbots/:id/chat(chatbot
對話)——都會回傳同樣的 HTTP 400 與
code: 1003,body 可能長這樣:
{"code": 1003, "details": "credit_points exhausted for org_id: ..."}{"code": 1003, "details": "Subscription status is not valid for org_id: ..."}
要分辨是哪一種,看 details
欄位即可。另外還有第三種、獨立的情況——組織根本沒有任何訂閱紀錄——會回傳
HTTP
403 與 code: 14005:
{"code": 14005, "details": "No active subscription found for org_id: ..."}非計量型呼叫(catalog 查詢、chatbot CRUD、presentation)不受影響。
如需查看目前用量或加值,請登入
Perxona Console → Subscription(請使用你帳號所在區域的網址)。如果你正在 Connect API
上開發自己的應用程式,建議偵測回應中的
code: 1003 與
code: 14005 並顯示友善的提示訊息——本套件的
sample demo 針對 1003 示範了這個做法,14005
可以比照處理。
Connect Kit 登録ユーザーは基本的に Perxona Console の
Free Plan
ユーザーとして扱われます。組織の credits
を使い切った場合、またはサブスクリプション自体が無効になっている場合、従量制の呼び出し——現時点では
POST /api/chatbots/:id/chat(チャットボットの会話)——が同じ HTTP 400 と
code: 1003
で失敗し、以下のいずれかのようなレスポンスを返します:
{"code": 1003, "details": "credit_points exhausted for org_id: ..."}{"code": 1003, "details": "Subscription status is not valid for org_id: ..."}
どちらかは
details
フィールドで判別できます。もう一つ、別のケースとして——組織にサブスクリプションのレコードが一切存在しない場合——こちらは
HTTP 403 と code: 14005
で失敗します:
{"code": 14005, "details": "No active subscription found for org_id: ..."}非従量制の呼び出し(カタログ参照、チャットボット CRUD、プレゼンテーション)は影響を受けません。
現在の利用量の確認やクレジットの追加は、
Perxona Console → Subscription
にサインインしてください(アカウントのリージョンに対応する
URL をご利用ください)。Connect API
上で独自のアプリケーションを構築している場合は、レスポンスの
code: 1003 と code: 14005
を検出してユーザーにわかりやすいメッセージを表示することをお勧めします——このキットのサンプルデモは
1003
についてこのパターンを示しており、14005
にも同じ考え方を適用できます。
Credit is your organization's shared usage meter, not scoped to Connect. The metered calls described above (chatbot conversations) draw from the same org-wide pool as any other billable conversation traffic on your account. Check your organization's current usage with a Secret key:
curl -X GET "$CONNECT_API_BASE/credit" \
  -H "X-Connect-Key: pxc_..."
{
"used_credit_points": 42,
"total_credit_points": 100,
"remaining_credit_points": 58,
"is_quota_exceeded": false,
"period_start": "2026-08-01T00:00:00Z",
"period_end": "2026-09-01T00:00:00Z"
}These numbers refresh roughly every 10 minutes — a background worker recalculates usage rather than updating it on every metered call, so checking right after a conversation may not reflect it yet.
This endpoint is Secret-key only — a
Publishable key gets 403, same as every other
capability a browser-facing key doesn't hold (see the
capability table in
Get Your API Credentials).
Credit 是你整個組織共用的用量計量器,不只算 Connect。上面提到的計量型呼叫(chatbot 對話)跟組織裡其他計費對話流量,共用同一個組織層級的額度。用 Secret 金鑰查你組織目前的用量:
curl -X GET "$CONNECT_API_BASE/credit" \
  -H "X-Connect-Key: pxc_..."
{
"used_credit_points": 42,
"total_credit_points": 100,
"remaining_credit_points": 58,
"is_quota_exceeded": false,
"period_start": "2026-08-01T00:00:00Z",
"period_end": "2026-09-01T00:00:00Z"
}這些數字大約每 10 分鐘更新一次——由背景工作定期重新計算,不是每次計量呼叫都即時更新,所以對話結束後馬上查可能還看不到。
這支端點只有 Secret 金鑰打得到——Publishable
金鑰會拿到 403,跟其他瀏覽器端金鑰沒有的能力
一樣(見取得 API 憑證的能力表)。
credit は組織全体で共有される利用量メーターであり、Connect に限りません。上記の課金対象の呼び出し(チャットボットの会話)は、組織内の 他の課金対象の会話トラフィックと同じ組織単位の credit プールを消費します。Secret キーで組織の現在の利用量を確認できます:
curl -X GET "$CONNECT_API_BASE/credit" \
  -H "X-Connect-Key: pxc_..."
{
"used_credit_points": 42,
"total_credit_points": 100,
"remaining_credit_points": 58,
"is_quota_exceeded": false,
"period_start": "2026-08-01T00:00:00Z",
"period_end": "2026-09-01T00:00:00Z"
}この数値は約 10 分ごとに更新されます——バックグラウンドのワーカーが定期的に再計算するもので、計量対象の呼び出しのたびに即時更新されるわけではないため、会話の直後に確認してもまだ反映されていないことがあります。
このエンドポイントはSecret キー専用です——Publishable キーは
403
になります。ブラウザ向けキーが持たない他の権限と同じ扱いです(API 認証情報を取得の権限表を参照)。
Avatar and Scene Catalog Avatar 與 Scene Catalog Avatar と Scene の Catalog
| Method | Path | Purpose 用途 用途 |
|---|---|---|
| GET | /assets/avatars |
List active avatars available to the authenticated organization. 列出驗證組織可用的啟用中 Avatar。 認証済み組織で利用できる有効な Avatar を一覧します。 |
| GET | /assets/avatars/{avatar_id} |
Read avatar detail, including its runtime configuration. 取得 Avatar 詳細資料,包含執行期設定。 実行時設定を含む Avatar 詳細を取得します。 |
| GET | /assets/avatars/{avatar_id}/motions |
List motions compatible with the avatar; filter by
pose_tag or motion_ids when
needed.
列出與 Avatar 相容的 Motion;需要時可用
pose_tag 或
motion_ids 篩選。
Avatar と互換性のある Motion を一覧します。必要に応じて
pose_tag または
motion_ids で絞り込みます。
|
| GET |
/assets/scenes/assets/scenes/{scene_id}
|
List active scenes or read one scene's detail. 列出啟用中的 Scene,或讀取單一 Scene 詳情。 有効な Scene を一覧するか、1 件の Scene 詳細を取得します。 |
| POST | /assets/vrm/upload |
Upload a .vrm file as multipart form data
and publish it as an active avatar. Requires a
secret key. Fields:
vrm_file, skeleton_type, and
optionally avatar_name and
lipsync_mode. Returns the new
avatar_id. See
VRM Uploader for the script
that checks a file before sending it.
Uploading is on hold for now — that
section explains why.
以 multipart form data 上傳 .vrm
檔案並發佈成啟用中的 Avatar。需要
secret
金鑰。欄位:vrm_file、skeleton_type,以及選填的
avatar_name 與
lipsync_mode。回傳新的
avatar_id。送出前先檢查檔案的 script 見VRM Uploader。目前暫停上傳,原因見該章節。
.vrm ファイルを multipart form data
としてアップロードし、有効な Avatar
として公開します。secret
キーが必要です。フィールドは
vrm_file、skeleton_type、任意で
avatar_name と
lipsync_mode。新しい
avatar_id
を返します。送信前にファイルを確認するスクリプトはVRM Uploaderを参照してください。現在アップロードは一時停止中です。理由は同セクションをご覧ください。
|
Voices and Presentation Voice 與 Presentation Voice と Presentation
| Method | Path | Purpose 用途 用途 |
|---|---|---|
| GET |
/voices/voices/{voice_id}
|
List custom voices or read a voice's public synthesis
details. Each voice carries a
languages array of the languages it speaks,
as short codes (en, ja, … —
never locales like en-US). The list
supports language and
provider filters; see the callout below
this table.
列出 custom voice,或讀取 voice 的公開合成設定。每個
voice 都帶
languages 欄位,列出它支援的語言,值是短碼
(en、ja⋯,不是
en-US 這種 locale)。列表支援
language 與
provider 篩選;詳見表格下方的說明。
custom voice を一覧するか、voice
の公開合成設定を取得します。各 voice
には対応言語を短縮コード(en、ja
など — en-US
のようなロケールではありません)で列挙する
languages フィールドが含まれます。一覧は
language と
provider
で絞り込めます。詳細は表の下の説明を参照してください。
|
| POST | /voice-tokens/tts |
Issue a provider TTS token for JSON body
{ voice_id }. Normal
<sv-presenter> speech manages this
runtime step for you.
為 JSON 主體 { voice_id } 發行 provider
TTS Token。一般的
<sv-presenter>
語音會自行處理此執行期步驟。
JSON body { voice_id } に対する provider
TTS Token を発行します。通常の
<sv-presenter>
発話では、この実行時処理はコンポーネントが行います。
|
| POST | /presentation |
Generate a one-shot presentation payload. Send
avatar_id and message;
voice_id, emotion, and
intensity are optional.
產生單次 presentation payload。傳入
avatar_id 與
message;voice_id、emotion
與 intensity 為選填。
単発の presentation payload を生成します。avatar_id
と
message
を渡し、voice_id、emotion、intensity
は任意です。
|
Pick a voice by the languages it speaks.
A multilingual agent needs a voice whose
languages cover every language it will speak.
The field uses short language codes (en,
ja, zh, …), never locales like
en-US; the full list of valid codes is the
Language enum in the generated OpenAPI spec. To
narrow the list server-side, pass one of those codes as the
language filter:
curl -X GET "$CONNECT_API_BASE/voices?language=ja" \
  -H "X-Connect-Key: pxc_..."
{
"items": [
{
"id": "8f14e45f-...",
"name": "Sakura",
"description": null,
"languages": ["ja"],
"provider": "azure"
}
],
"total": 1,
"page": 1,
"size": 50,
"pages": 1
}
That body is one page, not the whole catalogue.
page and size are query parameters
(size defaults to 50, maximum 100), and
pages tells you how many pages the filter
matched — keep requesting pages until you have read them all
before concluding that no voice speaks a language.
A voice with no recorded language data returns an empty
languages array — treat that as "unknown", not
"supports nothing".
用語音支援的語言來挑 voice。多語 Agent
需要一個 languages 涵蓋它所有會講語言的
voice。這個欄位用語言短碼
(en、ja、zh⋯),不是
en-US 這種 locale;完整的合法值清單是產生出來的
OpenAPI spec 裡的 Language
enum。想在伺服器端先過濾,把其中一個短碼傳給
language 篩選參數:
curl -X GET "$CONNECT_API_BASE/voices?language=ja" \
  -H "X-Connect-Key: pxc_..."
{
"items": [
{
"id": "8f14e45f-...",
"name": "Sakura",
"description": null,
"languages": ["ja"],
"provider": "azure"
}
],
"total": 1,
"page": 1,
"size": 50,
"pages": 1
}
這個回應只是一頁,不是全部。page 與
size 是查詢參數(size 預設
50、上限 100),pages
則告訴你這個篩選共有幾頁——要判斷「沒有 voice
支援某語言」之前,請把所有頁都讀完。
voice 沒有語言資料時,languages
會是空陣列——請當成「未知」,而不是「不支援任何語言」。
voice は対応言語で選びます。多言語エージェントには、話すすべての言語を
languages がカバーする voice
が必要です。このフィールドは言語の短縮コード(en、ja、zh
など)を使い、en-US
のようなロケールではありません。有効なコードの一覧は、生成された
OpenAPI spec の Language
enum です。サーバー側で絞り込むには、その短縮コードを
language フィルタに渡します:
curl -X GET "$CONNECT_API_BASE/voices?language=ja" \
  -H "X-Connect-Key: pxc_..."
{
"items": [
{
"id": "8f14e45f-...",
"name": "Sakura",
"description": null,
"languages": ["ja"],
"provider": "azure"
}
],
"total": 1,
"page": 1,
"size": 50,
"pages": 1
}
このレスポンスは 1 ページ分であり、全件ではありません。page
と size はクエリパラメータで(size
のデフォルトは 50、最大 100)、pages
はその絞り込みが何ページあるかを示します。「その言語に対応する
voice がない」と判断する前に、全ページを読み切ってください。
言語データが登録されていない voice では
languages
が空配列になります——「対応言語なし」ではなく「不明」として扱ってください。
Chatbots
| Method | Path | Purpose 用途 用途 |
|---|---|---|
|
GET POST |
/chatbots |
List chatbots or create one. Creation uses
multipart/form-data: name,
optional custom_instructions,
knowledge_file, and a JSON-string
tools field.
列出或建立 chatbot。建立時使用
multipart/form-data:name、選填
custom_instructions、knowledge_file
與 JSON 字串 tools 欄位。
chatbot を一覧または作成します。作成は
multipart/form-data
を使用し、name、任意の
custom_instructions、knowledge_file、JSON 文字列の
tools フィールドを渡します。
|
|
GET PATCH DELETE |
/chatbots/{chat_bot_id} |
Read, partially update, or soft-delete a chatbot.
Updates use multipart/form-data; use
remove_knowledge to remove its knowledge
file.
讀取、部分更新或 soft-delete chatbot。更新使用
multipart/form-data;使用
remove_knowledge 移除 knowledge
file。
chatbot の取得、部分更新、soft-delete
を行います。更新は
multipart/form-data を使用し、knowledge
file の削除には
remove_knowledge を使います。
|
| POST | /chatbots/{chat_bot_id}/chat |
Send a JSON message history in the Connect parts format
and receive reply_text, which can be passed
to presenter.present().
以 Connect parts 格式傳送 JSON 訊息歷程,取得可傳入
presenter.present() 的
reply_text。
Connect parts 形式の JSON メッセージ履歴を送り、presenter.present()
に渡せる reply_text を受け取ります。
|
Credit
| Method | Path | Purpose 用途 用途 |
|---|---|---|
| GET | /credit |
Read the organization's current credit usage — used, total, remaining, and the current period's start/end. Secret-key only; see Get Your API Credentials for the capability breakdown. 讀取組織目前的 credit 用量——已用、總量、剩餘,以及當期起訖時間。只有 Secret 金鑰打得到;能力表見取得 API 憑證。 組織の現在の credit 利用量——使用済み、合計、残り、当期の開始/終了を取得します。Secret キー専用です。権限の内訳はAPI 認証情報を取得を参照してください。 |
Get Your API Credentials
Two things, in this order: a Perxona account, then the two Connect API keys you create from it. The keys are what your integration actually authenticates with — the account only exists so you can sign in to the console and issue them.
Sign up on the Perxona console and sign in. That account is what lets you create the two API keys — the integration itself never uses your password.
signup, confirm-signup,
forgot-password and
reset-password endpoints are deprecated and no
longer supported. Create your account on the console instead;
password recovery is on its sign-in page.
Create Your Two API Keys
Sign in to the Perxona console with that account and open Organization → Integration → Connect API keys. Create two keys — they are not interchangeable, and the form shows what each type can do before you create it — the same breakdown is below:
| Create with type | Put it in | Allowed domains |
|---|---|---|
| Secret | PERXONA_CONNECT_SECRET_KEY |
Leave empty. See the warning below. |
| Publishable | PERXONA_CONNECT_PUBLISHABLE_KEY |
Set them once you know where the page is served from. |
What Each Key Type Can Do
| Capability | Secret | Publishable |
|---|---|---|
| Read assets (avatars, scenes, motions) | ✓ | ✓ |
| Read voices | ✓ | ✓ |
| Generate presentation | ✓ | ✓ |
| Generate TTS token | ✓ | ✓ |
| Upload assets (VRM upload) | ✓ | — |
| Chat with a bot | ✓ | — |
| Manage chat bots (create, update, delete) | ✓ | — |
| Read credit usage | ✓ | — |
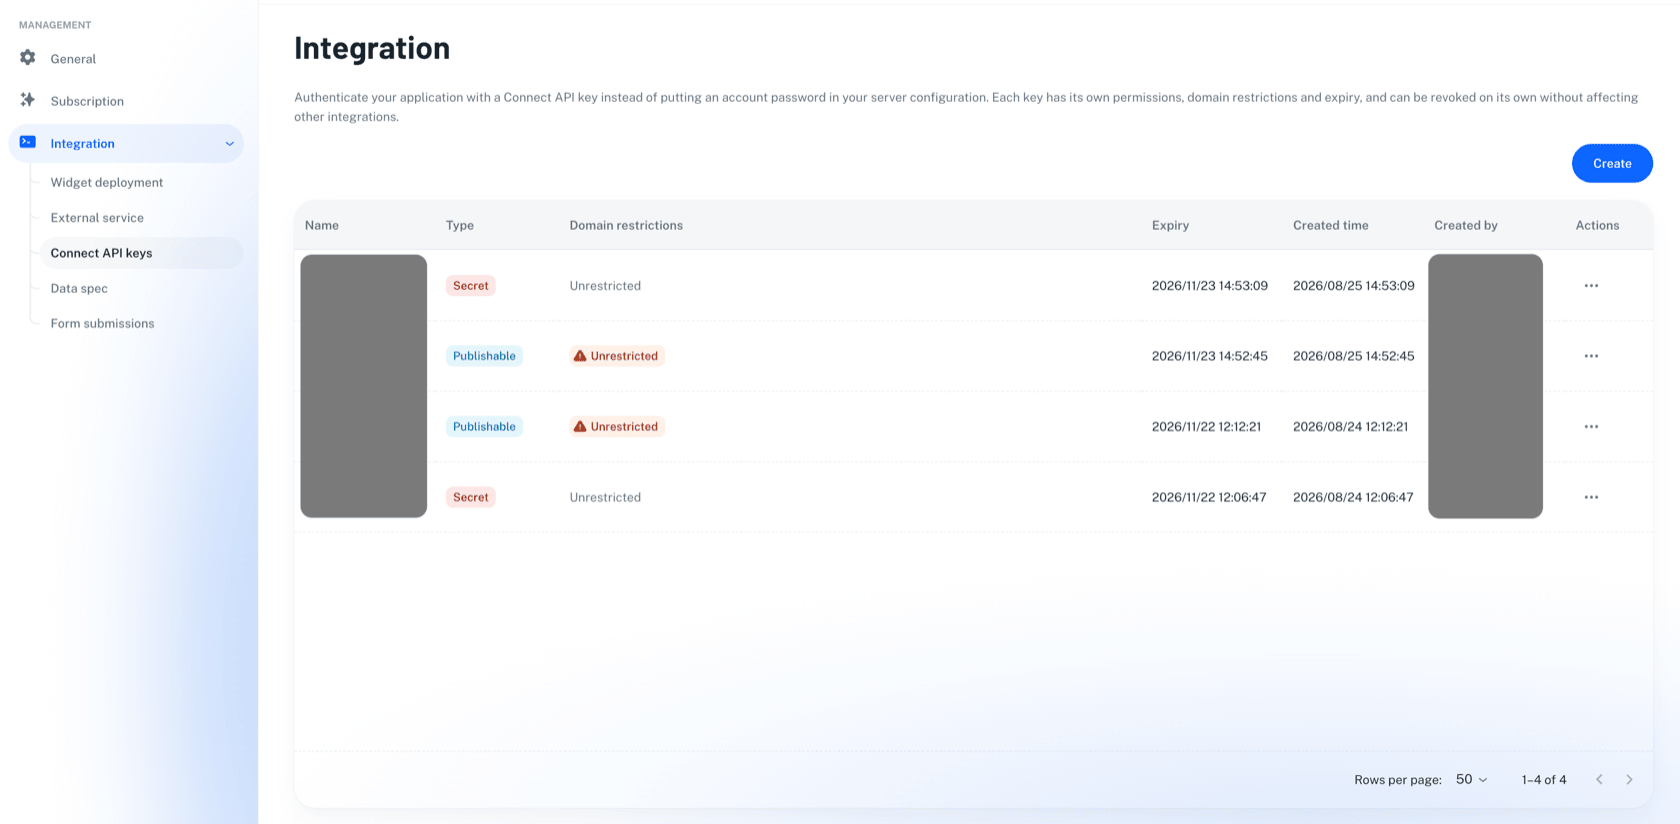
.env before closing the dialog. Lost one? Revoke
it and create another — there is no way to read it back.
PERXONA_CONNECT_PUBLISHABLE_KEY runs without
error — it just means every visitor is now served a key that
can manage your chatbots. Check the type shown on the console,
not the string shape.
Origin header, and a server-to-server request
never sends one — so a secret key with domains configured is
refused on every call — and the error says only that
the origin is not allowed, never what it saw, because nothing
was sent. Domain restrictions belong on the publishable key,
which really is used by a browser. Enter a bare hostname — no
https://, port, or path. A leading
*. covers subdomains only, not the apex domain
itself — list both separately if your page can be served from
either (e.g. example.com and
*.example.com).
.env and follow
Run the Express Sample, or go
straight to the
Presenter component flow to wire
them into your own application.
取得 API 憑證
兩件事,依這個順序:先有 Perxona 帳號,再用它建立 兩把 Connect API 金鑰。真正用來驗證的是金鑰; 帳號的作用只是讓你能登入 console 把金鑰發出來。
在 Perxona console 註冊並登入。帳號的作用是讓你建立那兩把 API 金鑰——整合本身從頭到尾不會用到你的密碼。
signup、confirm-signup、forgot-password
與 reset-password
端點已棄用、不再受支援。帳號請在 console 建立;忘記密碼請用
console 登入頁的重設流程。
建立你的兩把 API 金鑰
以該帳號登入 Perxona console,開啟 Organization → Integration → Connect API keys。 建立兩把金鑰——它們不可互換,而且建立前表單就會列出各自能做什麼,下面這張表是同樣的內容:
| 建立時選的類型 | 填進哪個變數 | 允許網域 |
|---|---|---|
| Secret | PERXONA_CONNECT_SECRET_KEY |
請留空。見下方警告。 |
| Publishable | PERXONA_CONNECT_PUBLISHABLE_KEY |
確定頁面會從哪裡提供之後再設定。 |
各金鑰類型能做什麼
| 能力 | Secret | Publishable |
|---|---|---|
| 讀取素材(avatar、場景、動作) | ✓ | ✓ |
| 讀取語音 | ✓ | ✓ |
| 產生 presentation | ✓ | ✓ |
| 產生 TTS token | ✓ | ✓ |
| 上傳素材(VRM upload) | ✓ | — |
| 與 chatbot 對話 | ✓ | — |
| 管理 chatbot(建立、更新、刪除) | ✓ | — |
| 查詢 credit 用量 | ✓ | — |
.env。弄丟了就撤銷它、再建一把——沒有辦法把它讀回來。
PERXONA_CONNECT_PUBLISHABLE_KEY
不會報錯——只是每個訪客從此拿到一把能管理你 chatbot
的金鑰。請以 console 上顯示的類型為準,不要靠字串長相判斷。
Origin
header,而伺服器對伺服器的請求根本不會送出它——所以設了網域限制的
secret 金鑰會在每一次呼叫都被拒絕——而錯誤訊息只會說
origin
不被允許,不會告訴你它看到的是什麼,因為根本沒有東西被送出。網域限制屬於真的會被瀏覽器使用的
publishable 金鑰。填裸主機名——不要帶
https://、port 或路徑。開頭的
*. 只涵蓋子網域,不含 apex
本身——如果頁面可能同時從兩者提供,就分別列兩筆(例如
example.com 與 *.example.com)。
API 認証情報を取得
必要なものは 2 つ、この順番です:まず Perxona アカウント、次にそれで作る 2 つの Connect API キー。実際に認証に使うのはキーで、 アカウントはコンソールにサインインしてキーを発行するために存在します。
Perxona コンソールでサインアップし、サインインしてください。 アカウントは 2 つの API キーを作るためのもので、統合そのものがパスワードを使うことはありません。
signup、confirm-signup、forgot-password、reset-password
エンドポイントは非推奨となり、サポートされていません。アカウントはコンソールで作成してください。パスワードの再設定はコンソールのサインイン画面から行えます。
2 つの API キーを作成する
そのアカウントで Perxona コンソールにサインインし、Organization → Integration → Connect API keys を開きます。2 つのキーを作成してください—— 交換はできません。作成前にフォームが各タイプの権限を表示します。同じ内容を下の表にもまとめています:
| 作成時に選ぶタイプ | 入れる変数 | 許可ドメイン |
|---|---|---|
| Secret | PERXONA_CONNECT_SECRET_KEY |
空のままに。下の警告を参照。 |
| Publishable | PERXONA_CONNECT_PUBLISHABLE_KEY |
ページの配信元が決まってから設定してください。 |
各キータイプでできること
| できること | Secret | Publishable |
|---|---|---|
| アセットの読み取り(アバター、シーン、モーション) | ✓ | ✓ |
| 音声の読み取り | ✓ | ✓ |
| presentation の生成 | ✓ | ✓ |
| TTS token の生成 | ✓ | ✓ |
| アセットのアップロード(VRM upload) | ✓ | — |
| チャットボットとの会話 | ✓ | — |
| チャットボットの管理(作成・更新・削除) | ✓ | — |
| credit 利用量の読み取り | ✓ | — |
.env
にコピーしてください。紛失した場合は失効させて作り直します——読み戻す方法はありません。
PERXONA_CONNECT_PUBLISHABLE_KEY
に貼ってもエラーなく動きます——ただし、以後すべての訪問者に
chatbot
を管理できるキーが配られることになります。文字列の形ではなく、コンソールに表示される型を確認してください。
Origin
ヘッダーと照合されますが、サーバー間リクエストはそれを送りません——そのため、ドメインを設定した
secret
キーはすべての呼び出しで拒否されます——そしてエラーは
origin
が許可されていないとしか言わず、何を見たかは伝えません。何も送られていないからです。ドメイン制限は、実際にブラウザが使う
publishable
キーのためのものです。裸のホスト名を入力してください——https://、ポート、パスは不要です。先頭の
*.
はサブドメインのみをカバーし、apex
自体は含みません——ページが両方から配信される可能性がある場合は、両方を別々に列挙してください(例:example.com
と *.example.com)。
Motion Browser
Motion Browser is a standalone developer tool for customizing avatar motion — a wave on a greeting, a bow on "thank you". It solves the part you cannot do by guessing: browse the full motion catalog, preview each one live on a 3D avatar, and compose a script that mixes free speech text with motion cues until it reads and looks right. Then you export it to an AI coding assistant, which wires the whole thing into your own project — Motion Browser's own code is never part of what you ship; see "Exporting to an AI Coding Assistant" below for how that handoff works.
The core idea: the
<sv-presenter> Web Component understands
inline motion tags. Drop a [MOTION id:1] chip
anywhere in your script, and the avatar performs that animation
at exactly that point in the speech.
// The avatar says "I love", performs the wave motion, then finishes the line
await presenter.present("I love [MOTION wave:1] my avatar.");Demo
↗ Open the live Motion BrowserFeatures
- Avatar Preview — Full-screen 3D rendering; switch characters instantly from the top selector.
- Motion Library — Browse, search, and filter every available motion. Click any card to preview it live on the avatar.
- Script Composer — Rich-text editor where you mix free speech text with motion chips. Press Play to preview it here.
- Export — Header button that copies your current avatar, scene, voice, and script to your clipboard as one prompt, ready to hand to an AI coding assistant.
- Scene & Voice switching — Bottom control bar lets you swap scene and voice style without reloading.
Getting Started
Composing a Script with Motion Tags
-
Write your speech text
Type the words you want the avatar to say in the Script Composer.
-
Insert a motion chip
Find the motion in the Motion Library panel. Place your cursor at the desired point in the text, then click + to insert it as a chip.
-
Press Play to preview
The avatar speaks the full script and performs each motion at its marked position. The chip serializes to
[MOTION <id>:1]and is passed directly topresenter.present()— this is Motion Browser calling it for you, so you can hear and see the result before it goes anywhere near your own code. -
Ready? Export it
Once it reads and looks right, use the Export button in the header — see "Exporting to an AI Coding Assistant" below for what it copies and how to use it.
Exporting to an AI Coding Assistant
The Export button, in the top header, is how you get your configuration out of Motion Browser and into your own project — Motion Browser's own code is never part of what you ship, so this is the handoff. Click it and Motion Browser copies one prompt to your clipboard — your current avatar, scene, and voice (name and id), plus the full script from the Script Composer — ready to paste into an AI coding assistant (Claude Code, Cursor, or similar) working on your own Perxona Connect sample project. The assistant reads your project's own code and decides where these values belong; Motion Browser doesn't know your project's structure, so it never guesses for you. The button is disabled until the Script Composer has some content — a script, a motion chip, or both.
Hi there! [MOTION wave-1:1]. Press
Export, then paste the copied prompt into your assistant with
something like: "Wire this into my chatbot's
custom_instructions so it uses this greeting."
The assistant can point your chatbot's own instructions at
this exact line. Keep in mind that's still a chatbot
generating a reply — it follows instructions, but it isn't
guaranteed to reproduce the line verbatim, motion tag
included, on every single turn. Try it and see how it reads
before relying on it.
Motion Browser
Motion Browser 是一個獨立的開發者工具,讓你自訂 Avatar 的動作——打招呼時揮手、說「謝謝」時鞠躬。這種細節沒辦法用猜的,所以你可以在這裡把整個動作目錄瀏覽一遍,直接在 3D Avatar 上即時預覽每個動畫,再把說話文字和動作指令混著寫成一份腳本,慢慢調到唸起來順、看起來也對為止。調好之後,匯出給 AI 開發助手,讓它幫你接進你自己的專案——Motion Browser 自己的程式碼不會出現在你要出貨的東西裡;這個交接的具體做法見下方「匯出給 AI 開發助手」。
核心概念:<sv-presenter> Web
Component 支援行內動作標籤。在腳本文字中任意插入
[MOTION id:1],Avatar
就會在說話的對應時間點執行該動作。
// Avatar 說 "I love" 的同時執行揮手動作,再繼續說話
await presenter.present("I love [MOTION wave:1] my avatar.");示範
↗ 開啟完整版 Motion Browser功能
- Avatar 預覽 — 全螢幕 3D 渲染,可從頂部選擇器即時切換角色。
- Motion Library — 瀏覽、搜尋、篩選所有可用動作。點擊任一卡片即可在 Avatar 上即時預覽。
- Script Composer — 富文字編輯器,可在說話文字中混入動作 chip;按 Play 在這裡預覽。
- Export — 頁首按鈕,把你目前的 Avatar、Scene、Voice 和腳本組成一段 prompt 複製到剪貼簿,交給 AI 開發助手使用。
- 場景與聲音切換 — 底部控制列可即時切換場景與聲音,無需重新載入。
快速開始
在腳本中插入動作標籤
-
輸入說話文字
在 Script Composer 中輸入 Avatar 要說的話。
-
插入動作 chip
在 Motion Library 面板找到目標動作。將游標放在文字中想要插入動作的位置,點擊 + 插入為 chip。
-
按下 Play 預覽
Avatar 說完整腳本,並在每個標記位置執行對應動作。chip 會序列化為
[MOTION <id>:1]並直接傳入presenter.present()——這是 Motion Browser 幫你呼叫的,讓你在寫進自己的程式碼之前先聽、先看過結果。 -
準備好了?匯出它
唸起來、看起來都對了之後,使用頁首的 Export 按鈕——下方「匯出給 AI 開發助手」說明了它會複製什麼、該怎麼用。
匯出給 AI 開發助手
上方頁首裡的 Export 按鈕,是把你的設定從 Motion Browser 帶出來、接進你自己專案的方式——Motion Browser 自己的程式碼不會出現在你要出貨的東西裡,所以這就是那個交接點。點下去,Motion Browser 會把一段 prompt 複製到剪貼簿:你目前的 Avatar、Scene、Voice(名稱與 id),加上 Script Composer 裡的完整腳本——可以直接貼進你正在開發自己 Perxona Connect sample 專案的 AI 開發助手(Claude Code、Cursor 或類似工具)。助手會讀你專案自己的程式碼,自己決定這些值該放在哪裡;Motion Browser 不知道你專案的結構,所以它不會替你猜。Script Composer 裡沒有任何內容(文字或動作 chip)之前,這個按鈕會是停用的。
Hi there! [MOTION wave-1:1]。按下 Export,再把複製到的 prompt
貼給你的助手,並加上類似這樣的指示:「幫我把這個接進我 chatbot
的
custom_instructions,讓它用這句問候語。」助手就能把 chatbot
自己的指示指向這句話。但要記得,最終還是由 chatbot
自己生成回覆——它會依照指示行事,但不保證每一次對話都會一字不差地覆述這句話(包含動作標籤)。實際試過、看看效果如何,再決定要不要依賴它。
Motion Browser
Motion Browser は、アバターのモーションをカスタマイズするための独立した開発者ツールです——挨拶で手を振る、「ありがとう」でお辞儀する。勘では決められない部分をここで解決します:モーションカタログ全体を閲覧し、3D アバター上で各モーションをライブプレビューし、話す内容とモーション指定を組み合わせたスクリプトを、読んでも見ても違和感がなくなるまで調整します。仕上がったら、そのAI コーディングアシスタントへエクスポートして、自分のプロジェクトに組み込んでもらいます——Motion Browser 自体のコードが出荷物に含まれることはありません。この受け渡しの具体的な流れは、下の「AI コーディングアシスタントへのエクスポート」を参照してください。
中核となる考え方:<sv-presenter>
Web コンポーネントはインラインモーションタグを理解します。
スクリプトテキストのどこにでも
[MOTION id:1]
を挿入すると、アバターはその発話のタイミングでモーションを実行します。
// "I love" と言う際にウェーブモーションを実行し、発話を続けます
await presenter.present("I love [MOTION wave:1] my avatar.");デモ
↗ Motion Browser を新しいタブで開く機能
- アバタープレビュー — フルスクリーン 3D レンダリング。上部セレクターからキャラクターをリアルタイム切り替え。
- Motion Library — 利用可能なすべてのモーションを検索・フィルタリング。カードをクリックするとアバター上でライブプレビュー。
- Script Composer — テキストにモーションチップを混在させるリッチテキストエディター。Play でここでプレビューできます。
- Export — 現在の Avatar・Scene・Voice・スクリプトを 1 つのプロンプトとしてクリップボードにコピーする、ヘッダーのボタン。AI コーディングアシスタントにそのまま渡せます。
- シーン・音声切り替え — 下部コントロールバーでシーンと音声をリロードなしに即時変更。
開始する
スクリプトにモーションタグを挿入する
-
スピーチテキストを入力
Script Composer にアバターに発話させたいテキストを入力します。
-
モーションチップを挿入
Motion Library パネルで目的のモーションを見つけます。テキスト中の挿入したい位置にカーソルを置き、+ をクリックしてチップとして挿入します。
-
Play でプレビュー
アバターがスクリプト全体を発話し、各マーク位置でモーションを実行します。チップは
[MOTION <id>:1]にシリアライズされ、presenter.present()に直接渡されます——これは Motion Browser が代わりに呼び出しているだけなので、自分のコードに書く前に結果を耳と目で確認できます。 -
準備ができたらエクスポート
読んでも見ても問題なければ、上部ヘッダーの Export ボタンを使ってください——何がコピーされ、どう使うかは下の「AI コーディングアシスタントへのエクスポート」を参照してください。
AI コーディングアシスタントへのエクスポート
上部ヘッダーにある Export ボタンは、設定を Motion Browser から取り出し、自分のプロジェクトに組み込むための入り口です——Motion Browser 自体のコードが出荷物に含まれることはないため、これがその受け渡し点になります。クリックすると、Motion Browser は現在の Avatar・Scene・Voice(名前と id)と、Script Composer の完全なスクリプトをまとめた 1 つのプロンプトをクリップボードにコピーします——自分の Perxona Connect sample プロジェクトを作業している AI コーディングアシスタント(Claude Code、Cursor など)にそのまま貼り付けられます。アシスタントは自分のプロジェクトのコードを読んで、その値をどこに置くべきか自分で判断します。Motion Browser はあなたのプロジェクトの構造を知らないので、代わりに推測することはありません。Script Composer に何も入力されていない(テキストもモーションチップもない)間は、このボタンは無効化されています。
Hi there! [MOTION wave-1:1]。Export
を押してから、コピーされたプロンプトをアシスタントに貼り付け、「これを
chatbot の
custom_instructions
に組み込んで、この挨拶を使うようにして」といった指示を添えます。アシスタントは
chatbot 自身の instructions
をこの行に向けて設定できます。ただし、最終的に発話するのは
chatbot
自身であることに注意してください——指示には従いますが、モーションタグを含めて毎回一字一句同じ発話を再現する保証はありません。実際に試して、どう発話されるか確認してから活用してください。
VRM Uploader
Perxona Connect Kit lets you add your own
VRM characters to the avatar catalog yourself,
with one script and no extra infrastructure. This is the fastest
path from a .vrm file to a live, speaking avatar —
whether it's a branded mascot, a digital presenter, or a
personal project.
<sv-presenter>'s Three.js renderer has not
been released. The upload itself succeeds, but you cannot
list, select or display the result. Until this notice is
removed, run upload-vrm.sh with
--validate-only only. The checks are unaffected,
so you can still get your file ready. The rest of this section
describes how uploading works once it opens again.
Uploading Your VRM
upload-vrm.sh checks your file against everything
on this page and uploads it when it passes. It needs
bash, jq and curl, plus a
Connect API key of type secret — see
Get Your API Credentials. Only a
secret key may upload an asset.
-
Get the script
curl -fsSLO https://raw.githubusercontent.com/XRSPACE-Inc/perxona-connect-kit/main/tools/vrm-uploader/upload-vrm.sh chmod +x upload-vrm.sh -
Check the file
./upload-vrm.sh --validate-only my-avatar.vrmEvery check prints a line. Anything marked
FAILstops the upload. The one check that can only warn is about expression data, because a model without it still loads and plays motions. -
Upload it
On hold for now — see the notice at the top of this section. Do not run this step until that notice is removed.
export PERXONA_CONNECT_SECRET_KEY=pxc_...
./upload-vrm.sh --skeleton-type female my-avatar.vrm
The script talks to
https://console.perxona.ai/asiaunless you say otherwise. Outside that region, exportPERXONA_API_BASE_URLwith your own base URL first — a key issued in one region is not accepted in another, and the refusal never mentions regions.--skeleton-typepicks the motion style your avatar draws its gestures from:male,female,male_three_headorfemale_three_head. Clips are retargeted onto your own rig, so the wrong choice gives you gestures in the wrong style rather than a playback failure. Add--avatar-name "My Avatar"to set the display name; without it the file name is used.
The script prints the new avatar's id, and the character appears
in the avatar list returned by
GET /assets/avatars, ready to use in your project.
--json to either command and the script prints
one JSON object instead of the report, carrying a
pass/warn/fail entry
per check. Exit codes are fixed: 0 passed,
1 bad usage or a missing tool or key,
2 the checks failed, 3 the upload
failed. Something like this is enough to hand over:
"Download upload-vrm.sh from the Connect Kit repo, run it
with --validate-only --json on my .vrm, and tell me what to
fix before I upload."
Supported VRM Specification
Check your file against this list — every item can be verified in common tools such as VRoid Studio or Blender. No Perxona tooling is needed.
- VRM 1.0 is what this list assumes. A VRM 0.x file uploads too — the uploader reports which version it found rather than refusing one — but everything below is written against 1.0, so export 1.0 when you have the choice (for example from VRoid Studio).
- File size up to 50 MB.
-
Humanoid skeleton with all 15 required bones:
hips,spine,head, plus upper leg / lower leg / foot and upper arm / lower arm / hand on both sides. Other humanoid bones (chest, neck, shoulders, fingers, …) are optional, but once assigned they must follow the VRM 1.0 bone hierarchy. Bone names are free — we read the VRM humanoid mapping, not node names, so any DCC export works. - MToon materials recommended. Non-MToon materials still load, but fall back to basic unlit / PBR shading, so the look may differ from your DCC preview. Avatars are rendered with built-in lighting — light sources inside the VRM file have no effect.
VRMC_springBone) are not simulated — hair,
skirts, and accessories will not sway.
Lip-sync and Expressions
A model without expression data still loads and moves, but it will not lip-sync or emote. Provide at least one of:
-
VRM 1.0 expression presets (VRoid Studio
exports these by default): mouth shapes
aa,ih,ou,ee,oh; emotionshappy,angry,sad,relaxed,surprised; plusneutral, blink and look-at presets. -
ARKit-52 blendshapes: morph targets named
with the standard ARKit names (such as
jawOpen,eyeBlinkLeft). Standard names are what to aim for, but a decorated spelling such asFace.jawOpenis recognised too — names are matched without regard to case or surrounding whitespace, an exact match first and a containing one second.
Want the full picture of the format itself? See the official VRM 1.0 documentation (a Chinese-language community guide is also available here).
Reference Model: ViviPod42
Not sure what a qualifying file looks like? We verified ViviPod42 — a free model by softmind (vTuber ホームセンター) — against our pipeline: VRM 1.0, complete humanoid skeleton, all 18 expression presets, and 19 of 20 materials in MToon. Download it from the author's page on BOOTH and compare it with your own file.
Where to Find a VRM File
- Browse BOOTH for VRM models — many listings are still VRM 0.x, so confirm the version and the license terms before downloading.
- Or build your own with VRoid Studio (free) and export it as VRM 1.0.
Questions or a Failed Upload?
Not sure whether your file qualifies, or did an upload fail? Post the file details and the error message in our Discord channel and we will help you sort it out. Not on our Discord server yet? Join first via this invite link — the channel link above only opens for members.
VRM Uploader
Perxona Connect Kit 讓你用一支 script 自己把
VRM 角色加進 Avatar
目錄,不需要額外架設任何基礎設施。無論你想為產品打造品牌吉祥物、為受眾建立專屬的數位主持人,或是為個人專案製作原創角色,這都是從
.vrm 檔案到上線說話 Avatar 的最快路徑。
<sv-presenter>
的 Three.js renderer
也尚未釋出。上傳本身會成功,但之後你無法列出、選取或顯示這個角色。在這則提醒移除之前,upload-vrm.sh
請只搭配
--validate-only
使用;檢查功能不受影響,你仍然可以先把檔案準備好。本章節其餘內容說明的是重新開放後的上傳方式。
上傳你的 VRM
upload-vrm.sh
會照這一頁寫的每一條檢查你的檔案,通過就直接幫你上傳。它需要
bash、jq、curl,以及一把
secret 類型的 Connect API 金鑰——見取得 API 憑證。只有 secret 金鑰能上傳素材。
-
取得 script
curl -fsSLO https://raw.githubusercontent.com/XRSPACE-Inc/perxona-connect-kit/main/tools/vrm-uploader/upload-vrm.sh chmod +x upload-vrm.sh -
檢查檔案
./upload-vrm.sh --validate-only my-avatar.vrm每一項檢查各印一行。標成
FAIL的就不會上傳。唯一只會提示、不會擋的那一項是表情資料——沒有表情資料的模型一樣載得進來、也能做動作。 -
上傳
目前暫停——請見本章節開頭的提醒。在該提醒移除之前,請不要執行這個步驟。
export PERXONA_CONNECT_SECRET_KEY=pxc_...
./upload-vrm.sh --skeleton-type female my-avatar.vrm
不特別指定的話,script 會打
https://console.perxona.ai/asia。不在這一區的話,請先 exportPERXONA_API_BASE_URL指向你自己的 base URL——某一區發出的金鑰在另一區不被接受,而且拒絕訊息不會提到「區域」兩個字。--skeleton-type是選這隻 Avatar 的動作風格:male、female、male_three_head、female_three_head。動作會重定向到你自己的骨架上,所以選錯只是風格不對,不會播不出來。想自訂顯示名稱就加--avatar-name "My Avatar";不加就用檔名。
成功後 script 會印出新 Avatar 的 id,這隻角色也會出現在
GET /assets/avatars
的 Avatar 清單中,可以直接用在你的作品裡。
--json,script 就會印出單一 JSON
物件而不是報告,每項檢查各帶一個
pass/warn/fail。結束碼是固定的:0
通過、1 用法錯或缺工具、缺金鑰、2
沒通過檢查、3 上傳失敗。丟這樣一句給它就夠了:「去 Connect Kit repo 下載 upload-vrm.sh,對我的 .vrm 跑
--validate-only --json,告訴我上傳前要修什麼。」
支援的 VRM 規格
請先用這份清單核對你的檔案——每一條都能在 VRoid Studio、Blender 這類常見工具裡自行確認,不需要任何 Perxona 的工具。
- 這份清單是照 VRM 1.0 寫的。VRM 0.x 的檔案一樣可以上傳——上傳工具會回報它讀到哪一版,而不是拒絕——但下面每一條都是以 1.0 為準,所以匯出時(例如從 VRoid Studio)能選就選 VRM 1.0。
- 檔案大小上限 50 MB。
-
Humanoid 骨架,15 根必要骨齊全:
hips、spine、head,加上左右兩側的大腿/小腿/腳掌與上臂/前臂/手掌。其他 humanoid 骨骼(胸、頸、肩、手指等)可以不填,但填了就要符合 VRM 1.0 的骨骼階層。骨骼命名不限——我們讀的是 VRM 的 humanoid 對應表,不是節點名稱,任何 DCC 匯出的命名都可以。 - 建議使用 MToon 材質。非 MToon 材質仍可載入,但會退回基本的 unlit / PBR,外觀可能和你在 DCC 裡看到的不同。角色使用內建光照渲染——VRM 檔案裡的光源設定不會生效。
VRMC_springBone)不會被模擬——頭髮、裙擺、飾品不會擺動。
對嘴與表情
沒有表情資料的模型仍然能載入、能做動作,但不會對嘴、也不會有表情。 請至少準備以下其中一種:
-
VRM 1.0 表情 preset(VRoid Studio
匯出時預設就有):嘴型
aa、ih、ou、ee、oh;情緒happy、angry、sad、relaxed、surprised;加上neutral、眨眼與視線 preset。 -
ARKit-52 blendshape:morph target 用標準
ARKit 名稱命名(例如
jawOpen、eyeBlinkLeft)。建議用標準名稱,但Face.jawOpen這類帶前綴的寫法也認得——比對時不分大小寫、忽略前後空白,先找完全相同的,再找包含的。
想深入了解 VRM 格式本身?請參考 VRM 1.0 官方文件,也有 中文社群整理的說明。
參考範例:ViviPod42
不確定合格的檔案長什麼樣?我們實際驗證過 ViviPod42——由 softmind(vTuber ホームセンター)免費提供的模型:VRM 1.0、完整 humanoid 骨架、18 個表情 preset 全齊、20 個材質中 19 個是 MToon。可以到作者的 BOOTH 頁面 下載,和自己的檔案對照。
去哪裡找 VRM 檔案
- 到 BOOTH 找 VRM 模型——很多商品還是 VRM 0.x,下載前請先確認版本與授權條款。
- 或用免費的 VRoid Studio 自己做一隻,匯出時選 VRM 1.0。
有疑問或上傳失敗?
不確定自己的檔案符不符合規格,或上傳失敗?把檔案資訊和錯誤訊息貼到我們的 Discord 頻道,我們會協助你處理。還沒加入我們的 Discord 伺服器?請先用 邀請連結 加入——上面的頻道連結只有成員才打得開。
VRM アップローダー
Perxona Connect Kit では、スクリプト 1 本で自分の
VRM
キャラクターをアバターカタログに追加できます——追加のインフラ構築は一切不要です。ブランドマスコット、独自のデジタルプレゼンター、個人プロジェクト向けのオリジナルキャラクターなど、どんな用途でも
.vrm
ファイルからライブで話すアバターへの最速ルートです。
<sv-presenter>
の Three.js
レンダラーもまだリリースされていません。アップロード自体は成功しますが、そのアバターを一覧に出すことも、選択することも、表示することもできません。このお知らせが削除されるまでは、upload-vrm.sh
は
--validate-only
を付けてのみ実行してください。チェック機能には影響がないため、ファイルの準備は進められます。このセクションの以降の内容は、再開後のアップロード方法を説明しています。
VRM をアップロードする
upload-vrm.sh
は、このページに書かれた項目でファイルを確認し、通過したらそのままアップロードします。必要なのは
bash、jq、curl、そして
secret タイプの Connect API キーです——API 認証情報の取得を参照してください。アセットをアップロードできるのは secret
キーだけです。
-
スクリプトを取得する
curl -fsSLO https://raw.githubusercontent.com/XRSPACE-Inc/perxona-connect-kit/main/tools/vrm-uploader/upload-vrm.sh chmod +x upload-vrm.sh -
ファイルを確認する
./upload-vrm.sh --validate-only my-avatar.vrm各チェックが 1 行ずつ表示されます。
FAILが付いた項目があるとアップロードは行われません。唯一警告だけで止めないのは表情データの項目で、表情データがないモデルも読み込みとモーション再生はできるためです。 -
アップロードする
現在は一時停止中です——このセクション冒頭のお知らせをご覧ください。お知らせが削除されるまで、この手順は実行しないでください。
export PERXONA_CONNECT_SECRET_KEY=pxc_...
./upload-vrm.sh --skeleton-type female my-avatar.vrm
指定がなければ、スクリプトは
https://console.perxona.ai/asiaに接続します。別のリージョンを使う場合は、先にPERXONA_API_BASE_URLに自分の base URL を export してください——あるリージョンで発行したキーは別のリージョンでは受け付けられず、そのエラーメッセージにリージョンという語は出てきません。--skeleton-typeはアバターが参照するモーションのスタイルを選びます:male、female、male_three_head、female_three_head。クリップは自分のリグにリターゲットされるため、選択を誤っても再生に失敗するのではなく、スタイルが合わないだけです。表示名を指定するには--avatar-name "My Avatar"を付けます。付けない場合はファイル名が使われます。
成功するとスクリプトが新しいアバターの id を表示し、GET /assets/avatars
のアバターリストにもそのキャラクターが現れ、すぐに作品で使えます。
--json
を付けると、レポートの代わりに JSON オブジェクトを 1
つだけ出力し、各チェックに
pass/warn/fail
が入ります。終了コードは固定です:0 通過、1
使い方の誤り・ツールやキーの不足、2
チェック不合格、3
アップロード失敗。次のように伝えるだけで十分です:「Connect Kit のリポジトリから upload-vrm.sh
をダウンロードして、私の .vrm に対して --validate-only
--json で実行し、アップロード前に直すべき点を教えて。」
対応 VRM 仕様
このリストでファイルを確認してください。どの項目も VRoid Studio や Blender などの一般的なツールで確認でき、Perxona 側のツールは不要です。
- このリストは VRM 1.0 を前提にしています。VRM 0.x のファイルもアップロードできます——アップローダーは拒否せず、読み取ったバージョンを報告します——が、以下の項目はすべて 1.0 を基準に書かれているため、選べるときは VRM 1.0 でエクスポートしてください(VRoid Studio など)。
- ファイルサイズは最大 50 MB。
-
Humanoid スケルトンで必須 15
ボーンがすべて揃っていること:
hips、spine、head、および左右の上脚/下脚/足と上腕/前腕/手。その他の humanoid ボーン(胸、首、肩、指など)は任意ですが、割り当てる場合は VRM 1.0 のボーン階層に従う必要があります。ボーンの名前は自由です——参照するのは VRM の humanoid マッピングであってノード名ではないため、どの DCC からのエクスポートでも問題ありません。 - MToon マテリアル推奨。MToon 以外のマテリアルも読み込めますが、基本的な unlit / PBR にフォールバックするため、DCC でのプレビューと見た目が異なる場合があります。アバターは内蔵ライティングで描画されます——VRM ファイル内の光源設定は反映されません。
VRMC_springBone)はシミュレートされないため、髪、スカート、アクセサリーは揺れません。
リップシンクと表情
表情データのないモデルも読み込みと動作は可能ですが、リップシンクや 表情は再生されません。少なくとも次のいずれかを用意してください:
-
VRM 1.0 表情プリセット(VRoid Studio は
デフォルトで出力します):口形
aa、ih、ou、ee、oh;感情happy、angry、sad、relaxed、surprised;さらにneutral、まばたき、視線のプリセット。 -
ARKit-52 ブレンドシェイプ:標準の ARKit
名(
jawOpen、eyeBlinkLeftなど)でモーフターゲットを命名します。標準名が基本ですが、Face.jawOpenのような装飾付きの綴りも認識されます——大文字小文字と前後の空白を無視し、完全一致を優先、次に部分一致で照合します。
フォーマット自体を詳しく知りたい方は VRM 1.0 公式ドキュメント を参照してください(中国語コミュニティのガイドもあります)。
参考モデル:ViviPod42
条件を満たすファイルの実例が見たい方へ。softmind(vTuber ホームセンター)が無料公開している ViviPod42 を私たちのパイプラインで検証済みです:VRM 1.0、完全な humanoid スケルトン、18 種の表情プリセット、20 マテリアル中 19 が MToon。作者の BOOTH ページ からダウンロードして、自分のファイルと見比べてください。
VRM ファイルの入手先
- BOOTH で VRM モデルを探す——VRM 0.x の商品も多いため、ダウンロード前にバージョンとライセンス条項を確認してください。
- または無料の VRoid Studio で自作し、VRM 1.0 でエクスポートしてください。
質問・アップロード失敗時は
ファイルが条件を満たすか不安なとき、またはアップロードに失敗したときは、ファイル情報とエラーメッセージを Discord チャンネル に投稿してください。私たちがサポートします。まだサーバーに参加していない場合は、先に 招待リンク から参加してください——上のチャンネルリンクはメンバーのみ開けます。
Run the Express Sample
The sample app is a single Node/Express server that serves two
runnable browser demos, both built on the same
<sv-presenter> integration. They are split by
which side of the work you are looking at. Both
hold a conversation the avatar speaks aloud.
Embed is what it looks like once it is live: a
product page with an avatar answering questions on it, no
controls and nothing on the page about its own configuration.
Studio is the console you build that from:
browse the catalog, create and edit chatbots, interrupt
mid-sentence, and switch between a Perxona-hosted chatbot and
your own API key without losing the conversation. Run the server
once, then open either demo. The steps below get you from clone
to a talking avatar.
>=22 and two Connect API
keys — see
Get Your API Credentials.
-
Clone the sample
git clone https://github.com/XRSPACE-Inc/perxona-connect-kit.git cd perxona-connect-kit/samples/express -
Create your local config
cp .env.example .envOpen
.envand fill in the three required values. The two keys are not interchangeable — the secret one stays on the server, the publishable one is what the browser is given:PERXONA_API_BASE_URL=https://console.perxona.ai/asia PERXONA_CONNECT_SECRET_KEY=pxc_... PERXONA_CONNECT_PUBLISHABLE_KEY=pxc_... -
Install dependencies
npm installRequires Node
>=22. If your Node is too old,npm installrefuses with a clear upgrade message. -
Start the server
npm run dev    # with live reload (node --watch)
# or
npm start      # without watch
The terminal prints the local URL, e.g.
http://localhost:8083. -
Launch the avatar
Open the URL in your browser. The landing page offers two demos. In Studio, pick an Avatar, Scene, and Voice, then click Launch Presenter. In Embed there is nothing to pick and nothing to configure — the avatar and the chatbot are resolved for you; just type a message. Either way the first line needs a user gesture: browser autoplay policy only lets audio start from one, so no avatar anywhere can speak on page load. In Studio that gesture is the launch click; in Embed it is the message you send.
執行 Express 範例
範例應用是一個單一的 Node/Express 伺服器,提供兩個可執行的
browser demo,都建立在相同的
<sv-presenter>
整合之上。兩者的差別在於你看的是哪一面:兩者都會讓虛擬人開口進行多輪對話。
Embed是它上線之後的樣子:一個產品頁面,虛擬人在上面回答問題,沒有任何控制項,頁面上也不提自己的設定。
Studio則是你用來做出它的控制台:瀏覽
catalog、建立與編輯 chatbot、對話中打斷,並在 Perxona 託管的
chatbot 與你自己的 API key
之間切換而不中斷對話。伺服器只需啟動一次,即可開啟任一
demo。以下步驟帶你從 clone 到說話的虛擬人。
>=22 與兩把 Connect API
金鑰——見取得 API 憑證。
-
Clone 範例
git clone https://github.com/XRSPACE-Inc/perxona-connect-kit.git cd perxona-connect-kit/samples/express -
建立本機設定檔
cp .env.example .env開啟
.env並填入三個必填值。兩把金鑰不可互換——secret 留在伺服器,publishable 才是交給瀏覽器的那把:PERXONA_API_BASE_URL=https://console.perxona.ai/asia PERXONA_CONNECT_SECRET_KEY=pxc_... PERXONA_CONNECT_PUBLISHABLE_KEY=pxc_... -
安裝依賴套件
npm install需要 Node
>=22。若版本過舊,npm install會顯示明確的升級訊息並拒絕執行。 -
啟動伺服器
npm run dev    # 啟動並監聽檔案變更
# 或
npm start      # 不監聽變更
終端機會印出本機 URL,例如
http://localhost:8083。 -
啟動虛擬人
在瀏覽器開啟該 URL。首頁提供兩個範例。在 Studio 選擇 Avatar、Scene 和 Voice,再點 Launch Presenter。Embed 則沒有東西可選,也沒有東西要設定——虛擬人與 chatbot 都已經幫你解析好,直接打字就行。兩者的第一句話都需要一次使用者操作:瀏覽器的 autoplay 政策只允許音訊從真實操作開始,所以任何虛擬人都無法在頁面載入時自己說話。在 Studio 那個操作是啟動點擊,在 Embed 則是你送出的訊息。
Express サンプルを実行
サンプルアプリは 1 つの Node/Express サーバーで、同じ
<sv-presenter>
統合の上に構築された 2
つの実行可能なブラウザデモを提供します。どちらもアバターが読み上げる会話を行い、違うのは仕事のどちら側を見ているかです。
Embedは本番で動いている姿:アバターが質問に答えている製品ページで、コントロールはなく、ページ上に自身の設定について書かれたものもありません。
Studioはそれを作るためのコンソール:カタログを閲覧し、チャットボットを作成・編集し、発話中に割り込み、Perxona
ホストのチャットボットと自分の API
キーを会話を失わずに切り替えられます。サーバーを一度起動すれば、どちらのデモも開けます。以下の手順で、クローンからしゃべるアバターまで進めます。
>=22
と 2 つの Connect API キーが必要です——API 認証情報を取得を参照してください。
-
サンプルをクローン
git clone https://github.com/XRSPACE-Inc/perxona-connect-kit.git cd perxona-connect-kit/samples/express -
ローカル設定ファイルを作成
cp .env.example .env.envを開いて 3 つの必須値を入力してください。2 つのキーは交換できません——secret はサーバーに留め、publishable がブラウザに渡す方です:PERXONA_API_BASE_URL=https://console.perxona.ai/asia PERXONA_CONNECT_SECRET_KEY=pxc_... PERXONA_CONNECT_PUBLISHABLE_KEY=pxc_... -
依存関係をインストール
npm installNode
>=22が必要です。古いバージョンの場合、npm installは明確なアップグレードメッセージとともに失敗します。 -
サーバーを起動
npm run dev    # ライブリロード (node --watch)
# または
npm start      # ウォッチなし
ターミナルにローカル URL(例:
http://localhost:8083)が表示されます。 -
アバターを起動
ブラウザで URL を開いてください。ランディングページには 2 つのデモが表示されます。Studio では Avatar・Scene・Voice を選択して Launch Presenter をクリックします。Embed には選ぶものも設定するものもありません——アバターもチャットボットも解決済みなので、メッセージを入力するだけです。どちらの場合も最初の 1 行にはユーザー操作が必要です:ブラウザの autoplay ポリシーは実際の操作からしか音声再生を許可しないため、ページ読み込み時に自分からしゃべるアバターは存在しえません。Studio ではその操作が起動クリック、Embed では送信するメッセージです。
Sample Configuration
All configuration lives in .env. Copy
.env.example → .env and fill in your
values. Never commit .env — it is
in .gitignore.
範例設定
所有設定透過 .env 進行。將
.env.example 複製為
.env 並填入你的值。絕對不要提交 .env——它已在 .gitignore 中。
サンプル設定
すべての設定は .env で行います。.env.example
を .env にコピーして値を入力してください。.env は絶対にコミットしないでください——.gitignore に含まれています。
| Variable | Required必填必須 | Default預設值デフォルト | Description說明説明 |
|---|---|---|---|
PERXONA_API_BASE_URL |
✅ | — | Region-specific Connect API base URL. Ask your Perxona contact. 區域專屬的 Connect API 基底 URL。向 Perxona 聯絡人取得。 地域別の Connect API ベース URL。Perxona 担当者に確認してください。 |
PERXONA_CONNECT_SECRET_KEY |
✅ | — |
Secret Connect API key. Authenticates the server on
every upstream call; never served to a browser.
Leave its allowed domains empty — a
server sends no Origin, so any domain
restriction refuses every call.
Secret Connect API
金鑰。伺服器每次呼叫上游都帶著它,絕不下放瀏覽器。允許網域請留空——伺服器不會送出
Origin,設了網域限制會讓每次呼叫都被拒絕。
Secret の Connect API
キー。サーバーが上流の呼び出しごとに付与し、ブラウザには決して渡しません。許可ドメインは空にしてください——サーバーは
Origin
を送らないため、ドメイン制限があるとすべての呼び出しが拒否されます。
|
PERXONA_CONNECT_PUBLISHABLE_KEY |
✅ | — |
Publishable Connect API key. Served to the browser on
GET /api/connect-key and passed to the
presenter. Reads the catalog, generates presentations,
and mints speech tokens (the last two bill your
organization); it cannot reach the chatbot routes.
Publishable Connect API 金鑰。經
GET /api/connect-key
送給瀏覽器並交給 presenter。可讀取 catalog、產生
presentation、發放語音
token(後兩者會對組織計費);碰不到 chatbot 路由。
Publishable の Connect API キー。GET /api/connect-key
でブラウザに渡され、presenter
に渡されます。カタログの読み取り、presentation
の生成、音声トークンの発行ができ(後の 2
つは組織に課金されます)、chatbot
ルートには到達できません。
|
PORT |
— | 8083 |
Port the server listens on. 伺服器監聽的連接埠。 サーバーがリッスンするポート。 |
PRESENTER_URL |
— | cdn.perxona.ai/…/presenter.js |
Presenter engine CDN URL. Override only if your Perxona contact provides a specific URL. Presenter 引擎 CDN URL。僅在 Perxona 聯絡人提供特定 URL 時覆蓋。 Presenter エンジンの CDN URL。Perxona 担当者から特定の URL が提供された場合のみ上書きしてください。 |
LLM_API_KEY |
— | — |
Set to enable the chat panel. Any OpenAI-compatible key
works, including local Ollama via
LLM_BASE_URL.
設定以啟用聊天面板。支援任何 OpenAI 相容金鑰,包括透過
LLM_BASE_URL 的本地 Ollama。
チャットパネルを有効にするために設定します。LLM_BASE_URL
経由のローカル Ollama を含む OpenAI
互換のキーが使えます。
|
LLM_BASE_URL |
— | https://api.openai.com/v1 |
LLM endpoint URL (override for Ollama or other providers). LLM 端點 URL(Ollama 或其他供應商時覆蓋)。 LLM エンドポイント URL(Ollama 等に上書き)。 |
LLM_MODEL |
— | gpt-4o-mini |
LLM model name passed to the chat endpoint. 傳遞給聊天端點的 LLM 模型名稱。 チャットエンドポイントに渡す LLM モデル名。 |
Presenter
Both demos build on the same <sv-presenter>
integration — the essential pattern every Connect app needs, in
vanilla JS. Two building blocks are shared by both:
presenter initialization (fetch the publishable
key from your server and hand it to
initializeWithConnectKey()) and
driving speech (send text to
present()). A third —
catalog browsing (fetch avatars, scenes, and
voices) — belongs to Studio only; Embed reads its target from
.env and never touches the catalog. Here is the
shared lifecycle — each demo's own chapter below covers exactly
when it triggers initializeWithConnectKey() and
resumeAudioPlayback():
-
Page load:
app.jscallsGET /api/config, dynamically injects the presenter engine<script>frompresenterUrl. Studio then loads the catalog (/api/avatars,/api/scenes,/api/voices) to populate its dropdown selectors; Embed skips this — its target came fromfixedTargetin the same/api/configresponse. -
Initialize: After fetching
GET /api/connect-key, the demo callspresenter.initializeWithConnectKey(connectKey, { avatarId, sceneId, voiceId }).presenter.resumeAudioPlayback()must also run from a direct user gesture to satisfy browser autoplay policy — see each demo's chapter for exactly when. -
Ready state: The presenter fires
PRESENTER_STATUSwithdetail = "Ready"— the UI reveals the performance controls. -
Playback: Text is handed to
presenter.present(text), which queues the speech and the motion the Connect API selects for it.
Presenter
兩個 demo 都建立在同一個
<sv-presenter> 整合上——每個 Connect
應用都需要的核心模式,以原生 JS
呈現。兩者共用的基礎元件有兩個:presenter 初始化(向你的伺服器取得 publishable 金鑰並傳給
initializeWithConnectKey()),以及驅動語音(將文字傳給
present())。第三個——catalog 瀏覽(取得 avatar、scene 與 voice)——只屬於 Studio;Embed
的目標來自 .env,完全不碰
catalog。以下是共用的生命週期——各自何時觸發
initializeWithConnectKey() 和
resumeAudioPlayback(),見下面各 demo 自己的章節:
-
頁面載入:
app.js呼叫GET /api/config,從presenterUrl動態注入 presenter 引擎<script>。接著 Studio 會載入 catalog(/api/avatars、/api/scenes、/api/voices)以填充下拉選單;Embed 則跳過這一步——它的目標來自同一份/api/config回應裡的fixedTarget。 -
初始化:取得
GET /api/connect-key後,demo 會呼叫presenter.initializeWithConnectKey(connectKey, { avatarId, sceneId, voiceId })。presenter.resumeAudioPlayback()也必須在直接的使用者操作中執行才符合瀏覽器自動播放政策——確切的觸發時機見各 demo 自己的章節。 -
就緒狀態:presenter 觸發
PRESENTER_STATUS,detail = "Ready"——UI 顯示演出控制項。 -
播放:文字交給
presenter.present(text),它會排入語音以及 Connect API 為該段語音挑選的 motion。
Presenter
どちらのデモも同じ
<sv-presenter>
統合の上に成り立っています——すべての Connect
アプリに必要な基本パターンを、バニラ JS
で示します。両方に共通する基礎要素は 2 つ:presenter の初期化(サーバーから publishable キーを取得して
initializeWithConnectKey()
に渡す)、そして発話の駆動(テキストを
present()
に送る)。3
つ目のカタログの閲覧(avatar・scene・voice
の取得)は Studio だけのものです——Embed はターゲットを
.env
から読み込むため、カタログには一切触れません。以下は共通のライフサイクルです——initializeWithConnectKey()
と resumeAudioPlayback()
を実際にいつ呼ぶかは、下記の各デモの章を参照してください:
-
ページ読み込み:
app.jsがGET /api/configを呼び出し、presenterUrlから presenter エンジンの<script>を動的に注入します。続いて Studio はカタログ(/api/avatars、/api/scenes、/api/voices)を読み込んでドロップダウンを設定します。Embed はこれを行いません——ターゲットは同じ/api/configレスポンスのfixedTargetから得ています。 -
初期化:
GET /api/connect-keyを取得した後、デモはpresenter.initializeWithConnectKey(connectKey, { avatarId, sceneId, voiceId })を呼び出します。presenter.resumeAudioPlayback()もブラウザの自動再生ポリシーを満たすため直接のユーザー操作から実行する必要があります——正確なタイミングは各デモの章を参照してください。 -
準備完了状態:presenter が
detail = "Ready"でPRESENTER_STATUSを発行——UI がパフォーマンスコントロールを表示します。 -
再生:テキストが
presenter.present(text)に渡され、音声と Connect API が選択した motion がキューに入ります。
Embed
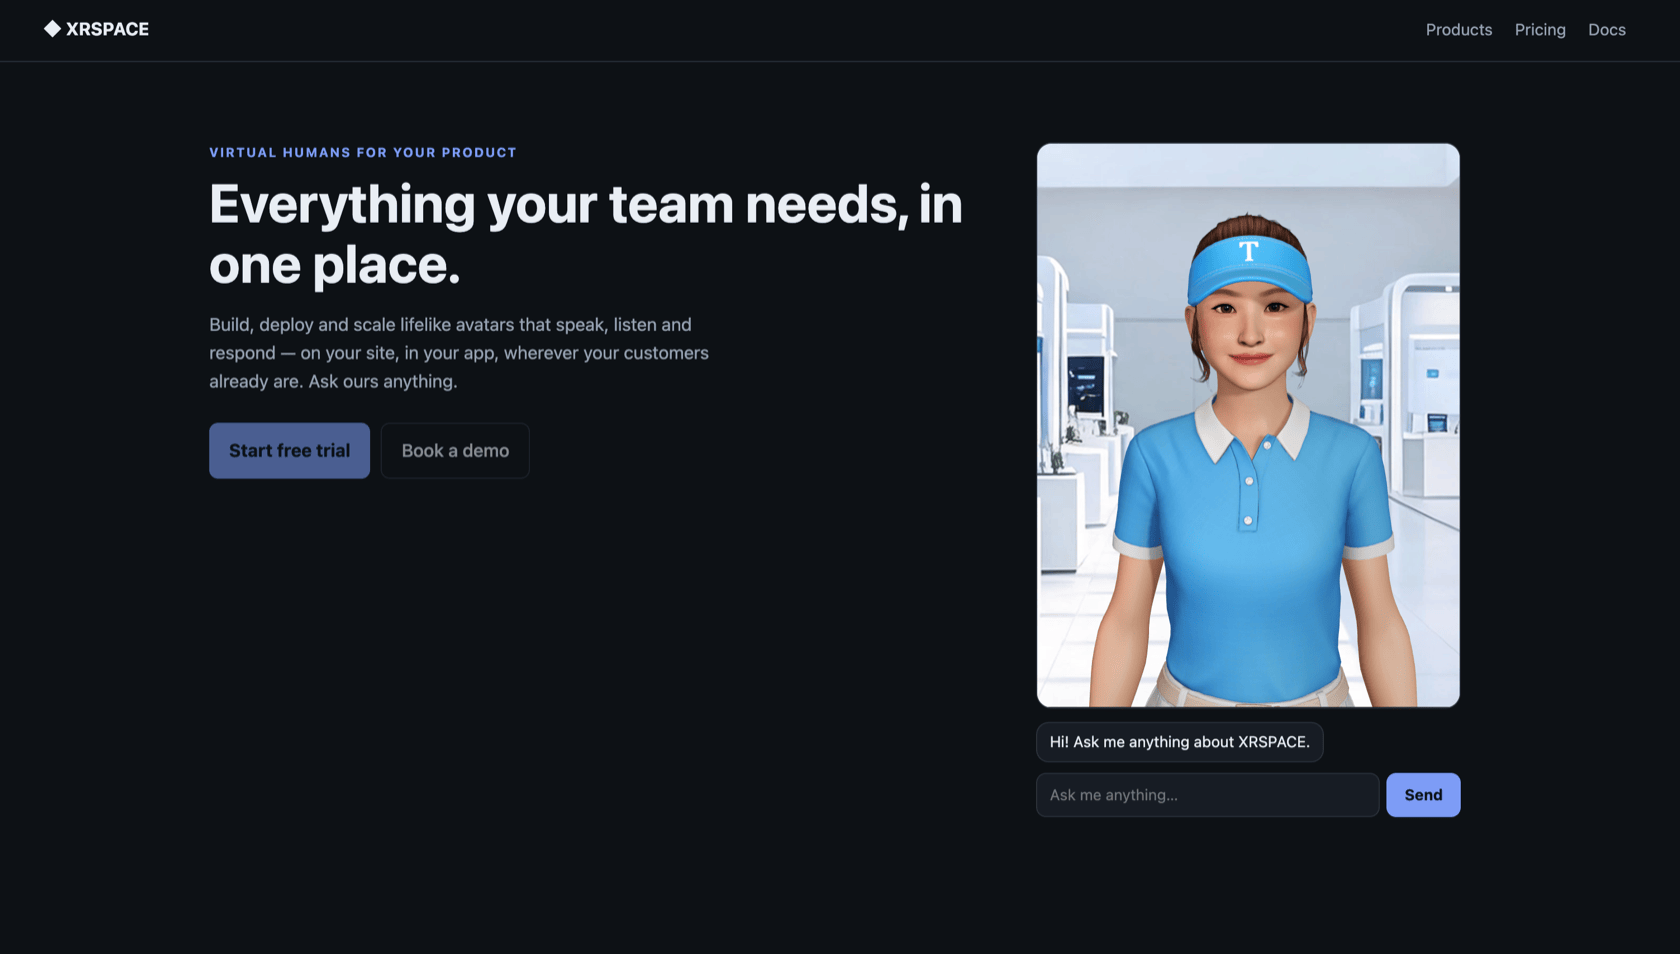
The demos/embed/ demo is what the Connect Kit looks
like once it is live: a product site with an avatar answering
questions on it. There is no catalog, no picker, no settings
panel — and, deliberately,
nothing anywhere on the page about its own
configuration. A real site does not explain its setup to visitors, so this
one doesn't either: everything the widget needs arrives already
resolved on GET /api/config, and when something is
missing the widget is simply not rendered and the reason goes to
the browser console. Open
http://localhost:8083/demos/embed/. Here is the
lifecycle:
-
Nothing to configure.
GET /api/configreports afixedTarget(avatar, scene, voice) and achatbotId. Leave everyDEMO_FIXED_*blank and the server picks the first of each in your account, so this runs on a fresh clone with no setup at all; set them to pin your own, which is what a real integration does. Which of the two happened is reported in the server's startup log, never on the page. Live credentials are required and the account needs at least one chatbot — mock mode can supply neither. -
Initialize on page load.
app.jsfetches that config andGET /api/connect-key, then callspresenter.initializeWithConnectKey(key, config.fixedTarget). No click and no catalog request are involved. -
Open the chat on Ready. When
PRESENTER_STATUSfires withReady, the message box appears. The listener is attached beforeinitializeWithConnectKey(): this event is the only way to learn the presenter is ready — nothing exposes a status to read back — so one fired while the listener is still anawaitaway is lost for good. -
Send a message; the reply is spoken. Each
message goes to
POST /api/chatbots/:id/chatwith the last twenty turns, and the reply is passed topresent(). The first submit is what unlocks audio.present()resolves withAUDIO_CONTEXT_UNAVAILABLEuntilresumeAudioPlayback()has run, and browser autoplay policy allows that only from a real user gesture — so a live site cannot greet you on load, and does not need a separate "enable audio" button either. The first thing you say authorises the first thing it says back.
Embed
demos/embed/ demo 展示 Connect Kit
上線之後的樣子:一個產品網站,虛擬人在上面回答問題。沒有
catalog、沒有選單、沒有設定面板——而且刻意在頁面上任何地方都不提它自己的設定。真的網站不會向訪客解釋自己怎麼設定的,所以這個也不會:widget
需要的一切都已經在 GET /api/config
解析好了,缺東西的時候就乾脆不渲染 widget,原因寫進瀏覽器
console。開啟
http://localhost:8083/demos/embed/。生命週期如下:
-
沒有東西需要設定。
GET /api/config會回報fixedTarget(avatar、scene、voice)與chatbotId。把所有DEMO_FIXED_*留空,伺服器會各挑你帳號裡的第一個,所以剛 clone 下來完全不用設定就能跑;要釘住自己的就填進去,這才是真實整合的做法。到底是哪一種,只會出現在伺服器的啟動 log,不會出現在頁面上。這需要真實憑證,而且帳號裡至少要有一個 chatbot——mock 模式兩者都提供不了。 -
頁面載入即初始化。
app.js取得該 config 與GET /api/connect-key,接著呼叫presenter.initializeWithConnectKey(key, config.fixedTarget)。沒有點擊,也沒有任何 catalog 請求。 -
Ready 時打開聊天框。當
PRESENTER_STATUS觸發Ready,輸入框才出現。監聽器註冊在initializeWithConnectKey()之前:這個事件是得知 presenter 就緒的唯一途徑——沒有任何可以事後讀取的狀態——所以在監聽器還隔著一個await時發出的事件就永遠錯過了。 -
送出訊息,回覆會被唸出來。每則訊息帶著最近二十輪送到
POST /api/chatbots/:id/chat,回覆再交給present()。第一次送出就是音訊的解鎖時機。在resumeAudioPlayback()執行前,present()一律回傳AUDIO_CONTEXT_UNAVAILABLE,而瀏覽器的 autoplay 政策只允許真實的使用者操作觸發它——所以真的網站無法在載入時就跟你打招呼,也不需要額外的「啟用音訊」按鈕。你說的第一句話,授權了它回你的第一句話。
Embed
demos/embed/ デモは、Connect Kit
が本番で動いている姿です:アバターが質問に答えている製品サイト。カタログもピッカーも設定パネルもなく、そして意図的にページ上のどこにも自身の設定について書かれていません。実際のサイトは訪問者に自分の設定を説明しないので、これもしません。widget
に必要なものはすべて
GET /api/config
で解決済みで届き、足りないものがあれば widget
を描画せず、理由はブラウザのコンソールに出します。http://localhost:8083/demos/embed/
を開いてください。ライフサイクルは次のとおりです:
-
設定するものはありません。
GET /api/configがfixedTarget(avatar・scene・voice)とchatbotIdを報告します。DEMO_FIXED_*をすべて空のままにすると、サーバーがアカウント内の最初のものをそれぞれ選ぶため、クローンしただけの状態で設定なしに動きます。自分のものを固定したい場合は設定してください。実際の統合ではこちらです。どちらだったかはサーバーの起動ログにのみ出力され、ページには出ません。実際の資格情報が必要で、アカウントに chatbot が最低 1 つ必要です——mock モードはどちらも提供できません。 -
ページ読み込み時に初期化。
app.jsがその config とGET /api/connect-keyを取得し、presenter.initializeWithConnectKey(key, config.fixedTarget)を呼び出します。クリックもカタログへのリクエストも発生しません。 -
Ready でチャットを開く。
PRESENTER_STATUSがReadyを発行すると、メッセージ入力欄が現れます。リスナーはinitializeWithConnectKey()の前に登録します:このイベントは presenter の準備完了を知る唯一の手段であり——読み戻せる状態はどこにも公開されていません——リスナーがまだawait一つ分先にある間に発火したものは永久に失われます。 -
メッセージを送ると、返答が読み上げられます。各メッセージは直近 20 ターンとともに
POST /api/chatbots/:id/chatへ送られ、返答がpresent()に渡されます。最初の送信が音声のロックを解除します。resumeAudioPlayback()が実行されるまでpresent()はAUDIO_CONTEXT_UNAVAILABLEを返し、ブラウザの autoplay ポリシーは実際のユーザー操作からしかそれを許可しません——ですから実際のサイトは読み込み時に挨拶できず、別途「音声を有効化」ボタンも必要としません。あなたが最初に言うことが、相手が最初に返す言葉を許可します。
Studio
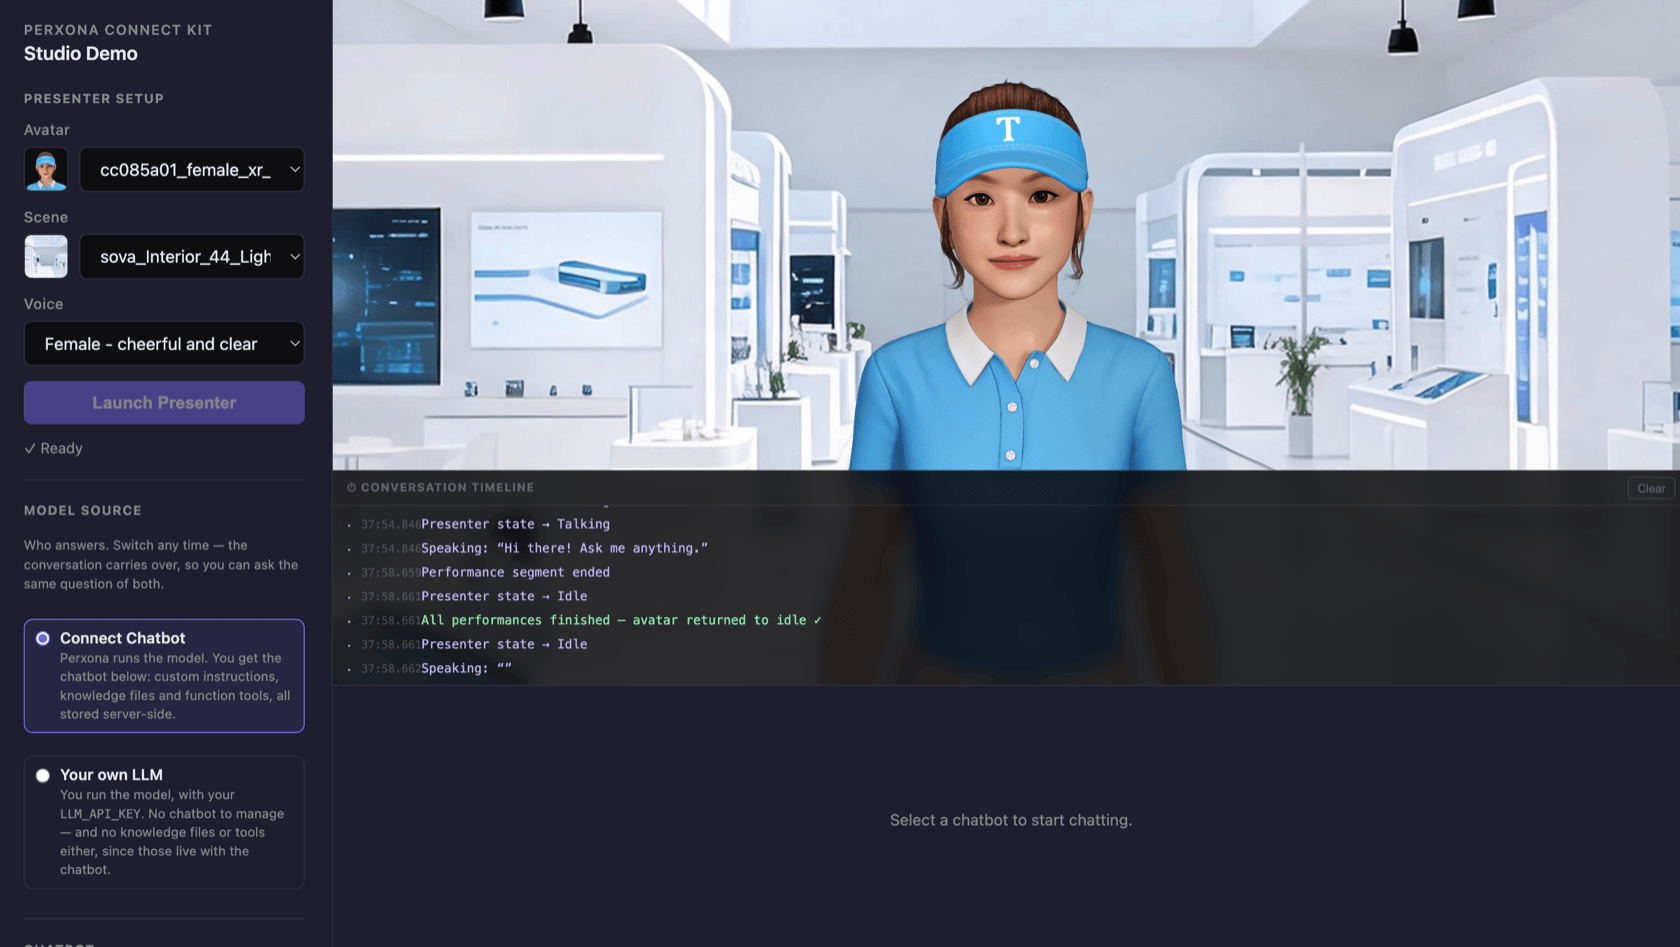
The demos/studio/ demo is the other end of the
range: you are building the application itself. On top of the
shared integration above it adds catalog pickers, full chatbot
CRUD, a persistent
multi-turn conversation, and
knowledge files plus
function tools. Every assistant reply is piped
into presenter.present(), so the avatar speaks each
response in real time. A source switch chooses
who runs the language model — a Perxona-hosted Connect chatbot,
or your own LLM_API_KEY — and you can flip it
mid-conversation: the history is kept provider-neutral as
{ role, text } and converted at the call site, so
the same conversation carries over to the other provider. Open
http://localhost:8083/demos/studio/. Here is the
lifecycle:
-
Launch the presenter. Pick an Avatar, Scene,
and Voice, then click Launch Presenter. That
click is also what calls
presenter.resumeAudioPlayback()— browser autoplay policy requires a direct user gesture before any audio can start. -
Choose who runs the model. The source switch
offers Connect chatbot and
Own LLM. Own LLM stays disabled until
LLM_API_KEYis set —GET /api/configreports whether it is available, never the key itself. -
Create or select a chatbot. With the Connect
source selected, click + New Chatbot, enter a
name and optional system instructions, and click
Save. The chatbot is created via
POST /api/chatbotsand immediately selected. To edit or delete an existing chatbot, pick it from the dropdown. The Own LLM source needs none of this — it has no server-side object to manage. -
Chat. Type a message and press Send. The
avatar enters Thinking state while the model works —
POST /api/chatbots/:id/chatfor the Connect source,POST /api/chatfor your own key. The reply appears in the chat log and is spoken aloud viapresenter.present(reply). If the presenter is not yet launched, chat still works as text-only. -
Optional — Knowledge file & function tools.
Upload a
.txt,.pdf,.doc,.docx, or.csvfile in the chatbot editor to ground the chatbot in your own content. Chunking and embedding happen asynchronously and can take anywhere from a few seconds to a few minutes — Studio polls the chatbot's status and updates the badge live, no reload needed. Add atoolsarray when creating or updating a chatbot to let it call external HTTP APIs during a conversation. Both are Connect-hosted features; switching to Own LLM leaves them behind, which is the trade the switch exists to show.
Studio
demos/studio/ demo
是光譜的另一端:你要做的是應用程式本身。在前面的共用整合基礎上,它加上了
catalog 選單、完整的 chatbot
CRUD、持久的多輪對話,以及
knowledge file 與
function tools。每則助理回覆都會傳入
presenter.present(),讓虛擬人即時發話。一個來源切換決定由誰執行語言模型——由
Perxona 託管的 Connect chatbot,或你自己的
LLM_API_KEY——而且可以在對話中途切換:對話歷史以
{ role, text }
這種與供應商無關的形式保存,只在呼叫當下轉換,所以同一段對話會直接延續到另一邊。開啟
http://localhost:8083/demos/studio/。生命週期如下:
-
啟動 presenter。選擇 Avatar、Scene 和
Voice,點擊
Launch Presenter。這個點擊同時也負責呼叫
presenter.resumeAudioPlayback()——瀏覽器的 autoplay 政策要求音訊必須從真實的使用者操作開始。 -
選擇由誰執行模型。來源切換提供
Connect chatbot 與
Own LLM。在設定
LLM_API_KEY之前,Own LLM 會是停用狀態——GET /api/config只回報它是否可用,永遠不會回傳 key 本身。 -
建立或選取 chatbot。在 Connect 來源下,點擊
+ New Chatbot,輸入名稱和可選的系統指令,點擊
Save。Chatbot 透過
POST /api/chatbots建立並立即選取。若要編輯或刪除現有 chatbot,從下拉選單中選取。Own LLM 來源不需要這一步——它沒有任何伺服器端物件要管理。 -
聊天。輸入訊息並按送出。模型處理期間虛擬人進入 Thinking
狀態——Connect 來源走
POST /api/chatbots/:id/chat,自己的 key 走POST /api/chat。回覆會顯示在聊天記錄中,並透過presenter.present(reply)唸出來。若 presenter 尚未啟動,聊天仍以純文字模式運作。 -
可選——Knowledge file 與 function tools。在
chatbot 編輯器中上傳
.txt、.pdf、.doc、.docx或.csv檔案,讓 chatbot 根據自有內容回答。切割與 embedding 是非同步進行的,可能需要幾秒到幾分鐘不等——Studio 會輪詢 chatbot 狀態並即時更新徽章,不需要重新整理頁面。建立或更新 chatbot 時傳入tools陣列,讓 chatbot 在對話中呼叫外部 HTTP API。這兩者都是 Connect 託管才有的功能;切到 Own LLM 就沒有了——而這正是這個切換要讓你看見的取捨。
Studio
demos/studio/
デモはもう一方の端です:アプリケーション自体を作る場合の姿です。上記の共通統合に加えて、カタログのピッカー、chatbot
の完全な
CRUD、永続的なマルチターン会話、そして
knowledge file と
function tools を備えます。すべての応答は
presenter.present()
に渡されるため、アバターがリアルタイムで読み上げます。ソース切り替えが言語モデルの実行者を決めます——Perxona
がホストする Connect chatbot か、自分の
LLM_API_KEY
か。会話の途中でも切り替えられます:履歴はプロバイダー非依存の
{ role, text }
として保持され、呼び出し時に変換されるため、同じ会話がそのままもう一方に引き継がれます。http://localhost:8083/demos/studio/
を開いてください。ライフサイクルは次のとおりです:
-
presenter を起動。Avatar・Scene・Voice
を選択して Launch Presenter
をクリックします。このクリックが
presenter.resumeAudioPlayback()も呼び出します——ブラウザの autoplay ポリシーは、音声の開始に直接のユーザー操作を要求するためです。 -
モデルの実行者を選ぶ。ソース切り替えには
Connect chatbot と
Own LLM があります。Own LLM は
LLM_API_KEYを設定するまで無効のままです——GET /api/configは利用可否のみを報告し、キー自体は決して返しません。 -
chatbot を作成または選択。Connect
ソースを選んだ状態で
+ New Chatbot
をクリックし、名前と任意のシステム指示を入力して
Save をクリックします。chatbot は
POST /api/chatbotsで作成され、すぐに選択されます。既存の chatbot を編集・削除するにはドロップダウンから選びます。Own LLM ソースにこの手順は不要です——管理すべきサーバー側オブジェクトがありません。 -
チャット。メッセージを入力して送信します。モデルの処理中、アバターは
Thinking 状態になります——Connect ソースは
POST /api/chatbots/:id/chat、自分のキーはPOST /api/chatを使います。応答はチャットログに表示され、presenter.present(reply)で読み上げられます。presenter が未起動でも、チャットはテキストのみで動作します。 -
任意——Knowledge file と function tools。
chatbot エディタで
.txt、.pdf、.doc、.docx、.csvのいずれかをアップロードすると、自分のコンテンツに基づいて chatbot が回答します。チャンク分割と embedding は非同期で行われ、数秒から数分かかることがあります——Studio は chatbot のステータスをポーリングし、リロード不要でバッジをリアルタイムに更新します。chatbot の作成・更新時にtools配列を渡すと、会話中に外部 HTTP API を呼び出せます。どちらも Connect ホスト側の機能です。Own LLM に切り替えると使えなくなります——このトレードオフこそ、切り替えが見せようとしているものです。
Express Sample Architecture
Both demos share the same three-layer foundation.
<sv-presenter> is the innermost component —
the CDN Web Component that handles all speech, motion, and
lip-sync directly via the Connect API. The demos wrap it with
different application layers depending on the use case.
Shared Architecture
Both demos are single-page avatar presenters. Each provides
catalog UI and an input, then initializes
<sv-presenter> with a Connect token — all
rendering, synthesis, and playback happen inside the component.
┌─ Browser ─────────────────────────────────────────────────────┐
│ ┌─ demos/<demo>/app.js ─────────────────────────────────┐ │
│ │ Catalog pickers · Launch button · Prompt/chat input │ │
│ │ │ │
│ │ ┌─ <sv-presenter> (Web Component, CDN) ──────────┐ │ │
│ │ │ Audio synthesis · Motion playback │ │ │
│ │ │ Lip-sync rendering · Token auto-refresh │ │ │
│ │ └─────────────────────────────────────────────────┘ │ │
│ └───────────────────────────────────────────────────────┘ │
└───────────────────────────────────────────────────────────────┘
│ /api/* (proxy) │ direct (publishable key)
▼ ▼
┌─ server.mjs ────────────┐ ┌─ Connect API ─────────────┐
│ /api/config │ │ /assets (catalog) │
│ /api/connect-key │────►│ /presentation │
│ /api/avatars │ │ /voice-tokens/tts │
│ /api/scenes │ └───────────────────────────┘
│ /api/voices │
│ /api/chat (opt-in) │
└─────────────────────────┘ Browser (app.js) server.mjs Connect API
│ │ │
1. ├─ GET /api/config ───►│ │
│◄─ presenterUrl ──────┤ │
2. ├─ load <script> from presenterUrl (CDN) │
│ │ │
3. ├─ GET /api/avatars ──►│ │
├─ GET /api/scenes ───►│ │
├─ GET /api/voices ───►│ │
│◄─ catalog items ─────┤ │
4. ├─ GET /api/connect-key ──────────────────────────────►│
│◄─ connect_key ───────────────────────────────────────┤
5. ├─ initializeWithConnectKey(key, { avatarId, … }) ────►│
│◄─ PRESENTER_STATUS: Ready ───────────────────────────┤
6. ├─ presenter.present("Hello!") ───────────────────────►│
│◄─ avatar speaks ─────────────────────────────────────┤Studio Demo
Adds the full client layer on top of the shared foundation
above. A source switch chooses who runs the model; a Chatbot
Manager handles bot CRUD, knowledge files, and function tools
for the Connect source. The Chat Panel drives multi-turn
conversations — each reply is piped straight into
<sv-presenter> for live speech.
┌─ Browser ───────────────────────────────────────────────────────┐
│ ┌─ demos/studio/app.js ────────────────────────────────────┐ │
│ │ ┌─ Chatbot Manager ────┐ ┌─ Avatar Stage ─────────┐ │ │
│ │ │ Bot picker (CRUD) │ │ ┌─ <sv-presenter> ─┐ │ │ │
│ │ │ Knowledge upload │ │ │ (CDN Component) │ │ │ │
│ │ │ Function tools │ │ │ initialize() │ │ │ │
│ │ └──────────────────────┘ │ │ present(reply) │ │ │ │
│ │ │ └──────────────────┘ │ │ │
│ │ ┌─ Chat Panel ─────────┐ └────────────────────────┘ │ │
│ │ │ Multi-turn history │ │ │
│ │ │ User → AI reply │ │ │
│ │ └──────────────────────┘ │ │
│ └──────────────────────────────────────────────────────────┘ │
└─────────────────────────────────────────────────────────────────┘
│ /api/* (proxy) │ direct (publishable key)
▼ ▼
┌─ server.mjs ───────────────────┐ ┌─ Connect API ──────────────┐
│ /api/chatbots (CRUD) │ │ /chatbots │
│ /api/chatbots/:id/chat │─►│ /chatbots/:id/chat │
│ /api/chatbots/:id/knowledge │ │ /assets · /presentation │
│ /api/connect-key │ └────────────────────────────┘
└────────────────────────────────┘ Browser (app.js) server.mjs Connect API
│ │ │
1-4. ├─ [config → catalog → connect-key → initializeWithConnectKey()]
│ │ │
5. ├─ POST /api/chatbots ──────────────────►│ create bot
│◄─ { id, name, status } ────────────────┤
6. ├─ POST /api/chatbots/:id/knowledge ────►│ upload file
│◄─ { knowledge: { status } } ───────────┤ (usually "processing" — chunking
│ │ + embedding run async)
6b. ├─ GET /api/chatbots/:id ───────────────►│ poll until status
│◄─ { knowledge: { status } } ───────────┤ leaves "processing"
│ │ (repeated every few seconds, up to a timeout — see Studio's
│ │ startKnowledgePolling in public/demos/studio/app.js)
7. ├─ POST /api/chatbots/:id/chat ─────────►│
│ { messages: [{ role, parts }] } │ AI response
│◄─ { reply_text } ──────────────────────┤
8. ├─ presenter.present(reply_text) ───────►│
│◄─ avatar speaks ───────────────────────┤Auth Model
.env), and the /api/* routes carry
no request-layer authorization at all — so
anyone who can reach this server can do everything the secret
key can, without ever holding it. Splitting the credential
stops the key from leaking into a browser; it does not stop
the capability from being reachable through the proxy. Fine
for demos and hackathons — not a production multi-tenant
design.
-
The server reads
PERXONA_CONNECT_SECRET_KEYandPERXONA_CONNECT_PUBLISHABLE_KEYfrom.env, and refuses to start unless both are set. -
Every upstream call carries the secret key as
an
X-Connect-Keyheader. There is no login step. -
The browser calls
GET /api/connect-key— the server returns the publishable key. The secret key is never served on any route. -
The browser passes it into
presenter.initializeWithConnectKey(connectKey, { avatarId,
                    sceneId, voiceId })
. -
From that point,
<sv-presenter>talks to the Connect API directly — speech and motion are handled by the component, not the server. -
Nothing is retried. A key is refused only
when it is revoked, expired, restricted to other domains, or
never granted the scope — so the upstream
401/403reaches the browser unchanged instead of being flattened into a502.
Express 範例架構
兩個 Demo 共用相同的三層基礎。
<sv-presenter>
是最內層的核心元件——一個 CDN Web Component,直接透過 Connect API
處理語音、動作與口型同步。Demo 以不同的應用層包裝它。
共用架構
兩個 demo 都是單頁式虛擬人 presenter。各自提供 catalog UI
與輸入框,然後以 Connect token 初始化
<sv-presenter>——所有渲染、合成與播放都在元件內部完成。
┌─ Browser ─────────────────────────────────────────────────────┐
│ ┌─ demos/<demo>/app.js ─────────────────────────────────┐ │
│ │ Catalog pickers · Launch button · Prompt/chat input │ │
│ │ │ │
│ │ ┌─ <sv-presenter> (Web Component, CDN) ──────────┐ │ │
│ │ │ Audio synthesis · Motion playback │ │ │
│ │ │ Lip-sync rendering · Token auto-refresh │ │ │
│ │ └─────────────────────────────────────────────────┘ │ │
│ └───────────────────────────────────────────────────────┘ │
└───────────────────────────────────────────────────────────────┘
│ /api/* (proxy) │ direct (publishable key)
▼ ▼
┌─ server.mjs ────────────┐ ┌─ Connect API ─────────────┐
│ /api/config │ │ /assets (catalog) │
│ /api/connect-key │────►│ /presentation │
│ /api/avatars │ │ /voice-tokens/tts │
│ /api/scenes │ └───────────────────────────┘
│ /api/voices │
│ /api/chat (opt-in) │
└─────────────────────────┘ Browser (app.js) server.mjs Connect API
│ │ │
1. ├─ GET /api/config ───►│ │
│◄─ presenterUrl ──────┤ │
2. ├─ load <script> from presenterUrl (CDN) │
│ │ │
3. ├─ GET /api/avatars ──►│ │
├─ GET /api/scenes ───►│ │
├─ GET /api/voices ───►│ │
│◄─ catalog items ─────┤ │
4. ├─ GET /api/connect-key ──────────────────────────────►│
│◄─ connect_key ───────────────────────────────────────┤
5. ├─ initializeWithConnectKey(key, { avatarId, … }) ────►│
│◄─ PRESENTER_STATUS: Ready ───────────────────────────┤
6. ├─ presenter.present("Hello!") ───────────────────────►│
│◄─ avatar speaks ─────────────────────────────────────┤Studio Demo
在上面的共用架構之上新增完整的用戶端層。來源切換決定由誰執行模型;Chatbot
Manager 則為 Connect 來源處理 bot CRUD、knowledge file 與
function tools。Chat Panel 驅動多輪對話——每個回覆直接串接至
<sv-presenter> 即時發話。
┌─ Browser ───────────────────────────────────────────────────────┐
│ ┌─ demos/studio/app.js ────────────────────────────────────┐ │
│ │ ┌─ Chatbot Manager ────┐ ┌─ Avatar Stage ─────────┐ │ │
│ │ │ Bot picker (CRUD) │ │ ┌─ <sv-presenter> ─┐ │ │ │
│ │ │ Knowledge upload │ │ │ (CDN Component) │ │ │ │
│ │ │ Function tools │ │ │ initialize() │ │ │ │
│ │ └──────────────────────┘ │ │ present(reply) │ │ │ │
│ │ │ └──────────────────┘ │ │ │
│ │ ┌─ Chat Panel ─────────┐ └────────────────────────┘ │ │
│ │ │ Multi-turn history │ │ │
│ │ │ User → AI reply │ │ │
│ │ └──────────────────────┘ │ │
│ └──────────────────────────────────────────────────────────┘ │
└─────────────────────────────────────────────────────────────────┘
│ /api/* (proxy) │ direct (publishable key)
▼ ▼
┌─ server.mjs ───────────────────┐ ┌─ Connect API ──────────────┐
│ /api/chatbots (CRUD) │ │ /chatbots │
│ /api/chatbots/:id/chat │─►│ /chatbots/:id/chat │
│ /api/chatbots/:id/knowledge │ │ /assets · /presentation │
│ /api/connect-key │ └────────────────────────────┘
└────────────────────────────────┘ Browser (app.js) server.mjs Connect API
│ │ │
1-4. ├─ [config → catalog → connect-key → initializeWithConnectKey()]
│ │ │
5. ├─ POST /api/chatbots ──────────────────►│ create bot
│◄─ { id, name, status } ────────────────┤
6. ├─ POST /api/chatbots/:id/knowledge ────►│ upload file
│◄─ { knowledge: { status } } ───────────┤ (usually "processing" — chunking
│ │ + embedding run async)
6b. ├─ GET /api/chatbots/:id ───────────────►│ poll until status
│◄─ { knowledge: { status } } ───────────┤ leaves "processing"
│ │ (repeated every few seconds, up to a timeout — see Studio's
│ │ startKnowledgePolling in public/demos/studio/app.js)
7. ├─ POST /api/chatbots/:id/chat ─────────►│
│ { messages: [{ role, parts }] } │ AI response
│◄─ { reply_text } ──────────────────────┤
8. ├─ presenter.present(reply_text) ───────►│
│◄─ avatar speaks ───────────────────────┤驗證模型
.env
裡的兩把金鑰),而且 /api/*
路由完全沒有請求層授權——所以任何連得到這台伺服器的人,不需要持有
secret
金鑰就能做到它能做的每一件事。拆成兩把擋住的是「金鑰外流到瀏覽器」,不是「能力經由
proxy 被觸及」。適合 Demo
和黑客松——不適合生產環境的多租戶設計。
-
伺服器從
.env讀取PERXONA_CONNECT_SECRET_KEY與PERXONA_CONNECT_PUBLISHABLE_KEY,缺任一把就拒絕啟動。 -
每次呼叫上游都帶著 secret 金鑰作為
X-Connect-Keyheader。沒有登入步驟。 -
瀏覽器呼叫
GET /api/connect-key——伺服器回傳 publishable 那把。secret 金鑰不會在任何路由上被提供。 -
瀏覽器將它傳入
presenter.initializeWithConnectKey(connectKey, { avatarId,
                    sceneId, voiceId })
。 -
從此時起,
<sv-presenter>直接與 Connect API 通訊——語音和動作由元件處理,而非伺服器。 -
不會重試。金鑰被拒只有四種原因:已撤銷、已過期、限定了其他網域、或從未被授予該權限——所以上游的
401/403會原樣傳到瀏覽器,而不是被蓋成502。
Express サンプルアーキテクチャ
両方のデモは同じ 3 層構成を共有しています。
<sv-presenter>
は最内層のコアコンポーネント —— Connect API
を通じて音声・モーション・リップシンクを直接処理する CDN Web
コンポーネントです。デモは用途に応じて異なるアプリケーション層でラップします。
共通アーキテクチャ
どちらのデモも単一ページのアバター Presenter です。カタログ UI
と入力を提供し、Connect トークンで
<sv-presenter>
を初期化します——レンダリング・合成・再生はすべてコンポーネント内で行われます。
┌─ Browser ─────────────────────────────────────────────────────┐
│ ┌─ demos/<demo>/app.js ─────────────────────────────────┐ │
│ │ Catalog pickers · Launch button · Prompt/chat input │ │
│ │ │ │
│ │ ┌─ <sv-presenter> (Web Component, CDN) ──────────┐ │ │
│ │ │ Audio synthesis · Motion playback │ │ │
│ │ │ Lip-sync rendering · Token auto-refresh │ │ │
│ │ └─────────────────────────────────────────────────┘ │ │
│ └───────────────────────────────────────────────────────┘ │
└───────────────────────────────────────────────────────────────┘
│ /api/* (proxy) │ direct (publishable key)
▼ ▼
┌─ server.mjs ────────────┐ ┌─ Connect API ─────────────┐
│ /api/config │ │ /assets (catalog) │
│ /api/connect-key │────►│ /presentation │
│ /api/avatars │ │ /voice-tokens/tts │
│ /api/scenes │ └───────────────────────────┘
│ /api/voices │
│ /api/chat (opt-in) │
└─────────────────────────┘ Browser (app.js) server.mjs Connect API
│ │ │
1. ├─ GET /api/config ───►│ │
│◄─ presenterUrl ──────┤ │
2. ├─ load <script> from presenterUrl (CDN) │
│ │ │
3. ├─ GET /api/avatars ──►│ │
├─ GET /api/scenes ───►│ │
├─ GET /api/voices ───►│ │
│◄─ catalog items ─────┤ │
4. ├─ GET /api/connect-key ──────────────────────────────►│
│◄─ connect_key ───────────────────────────────────────┤
5. ├─ initializeWithConnectKey(key, { avatarId, … }) ────►│
│◄─ PRESENTER_STATUS: Ready ───────────────────────────┤
6. ├─ presenter.present("Hello!") ───────────────────────►│
│◄─ avatar speaks ─────────────────────────────────────┤Studio Demo
上記の共通アーキテクチャの上に完全なクライアント層を追加します。ソース切り替えがモデルの実行者を決め、Chatbot
Manager が Connect ソース向けにボットの
CRUD・ナレッジファイル・ファンクションツールを処理します。Chat
Panel がマルチターン会話を駆動し、各返答は直接
<sv-presenter>
に渡されてライブで発話されます。
┌─ Browser ───────────────────────────────────────────────────────┐
│ ┌─ demos/studio/app.js ────────────────────────────────────┐ │
│ │ ┌─ Chatbot Manager ────┐ ┌─ Avatar Stage ─────────┐ │ │
│ │ │ Bot picker (CRUD) │ │ ┌─ <sv-presenter> ─┐ │ │ │
│ │ │ Knowledge upload │ │ │ (CDN Component) │ │ │ │
│ │ │ Function tools │ │ │ initialize() │ │ │ │
│ │ └──────────────────────┘ │ │ present(reply) │ │ │ │
│ │ │ └──────────────────┘ │ │ │
│ │ ┌─ Chat Panel ─────────┐ └────────────────────────┘ │ │
│ │ │ Multi-turn history │ │ │
│ │ │ User → AI reply │ │ │
│ │ └──────────────────────┘ │ │
│ └──────────────────────────────────────────────────────────┘ │
└─────────────────────────────────────────────────────────────────┘
│ /api/* (proxy) │ direct (publishable key)
▼ ▼
┌─ server.mjs ───────────────────┐ ┌─ Connect API ──────────────┐
│ /api/chatbots (CRUD) │ │ /chatbots │
│ /api/chatbots/:id/chat │─►│ /chatbots/:id/chat │
│ /api/chatbots/:id/knowledge │ │ /assets · /presentation │
│ /api/connect-key │ └────────────────────────────┘
└────────────────────────────────┘ Browser (app.js) server.mjs Connect API
│ │ │
1-4. ├─ [config → catalog → connect-key → initializeWithConnectKey()]
│ │ │
5. ├─ POST /api/chatbots ──────────────────►│ create bot
│◄─ { id, name, status } ────────────────┤
6. ├─ POST /api/chatbots/:id/knowledge ────►│ upload file
│◄─ { knowledge: { status } } ───────────┤ (usually "processing" — chunking
│ │ + embedding run async)
6b. ├─ GET /api/chatbots/:id ───────────────►│ poll until status
│◄─ { knowledge: { status } } ───────────┤ leaves "processing"
│ │ (repeated every few seconds, up to a timeout — see Studio's
│ │ startKnowledgePolling in public/demos/studio/app.js)
7. ├─ POST /api/chatbots/:id/chat ─────────►│
│ { messages: [{ role, parts }] } │ AI response
│◄─ { reply_text } ──────────────────────┤
8. ├─ presenter.present(reply_text) ───────►│
│◄─ avatar speaks ───────────────────────┤認証モデル
.env にある 2
つのキー)を共有し、さらに /api/*
ルートにはリクエスト層の認可が一切ありません——このサーバーに到達できる人は誰でも、secret
キーを持たずにそれができることをすべて実行できます。資格情報を分けることで防げるのは「キーがブラウザに漏れること」であって、「能力がプロキシ経由で到達可能であること」ではありません。デモやハッカソンには適していますが、本番のマルチテナント設計には不向きです。
-
サーバーが
.envからPERXONA_CONNECT_SECRET_KEYとPERXONA_CONNECT_PUBLISHABLE_KEYを読み込みます。両方が設定されていなければ起動しません。 -
上流へのすべての呼び出しに secret キーを
X-Connect-Keyヘッダーとして付けます。ログイン手順はありません。 -
ブラウザが
GET /api/connect-keyを呼び出し、サーバーは publishable キーを返します。secret キーはどのルートでも配信されません。 -
ブラウザがそれを
presenter.initializeWithConnectKey(connectKey, { avatarId, sceneId, voiceId })に渡します。 -
その後、
<sv-presenter>は Connect API と直接通信します——音声とモーションはコンポーネントが処理し、サーバーは関与しません。 -
リトライはしません。キーが拒否されるのは、失効・期限切れ・他ドメインへの限定・スコープ未付与の
4 つだけです——ですから上流の
401/403は502に潰されず、そのままブラウザに届きます。
Express Sample Adapter API
The Express server exposes these routes. All
/api/* endpoints return JSON. The server proxies
catalog reads to the Connect API with its
secret key, sent as an
X-Connect-Key header — there is no login step, and
no per-request browser auth either.
Express 範例 Adapter API
Express 伺服器公開以下路由。所有 /api/* 端點均回傳
JSON。伺服器以自己的 secret 金鑰、透過
X-Connect-Key header 將 catalog 讀取代理至 Connect
API——沒有登入步驟,也不需要每個請求的瀏覽器驗證。
Express サンプル Adapter API
Express サーバーは以下のルートを公開します。すべての
/api/* エンドポイントは JSON
を返します。サーバーは自身の secret キーを
X-Connect-Key ヘッダーとして送り、Connect API
へカタログ読み取りをプロキシします——ログイン手順はなく、リクエストごとのブラウザ認証も不要です。
/api/* route below is this sample's own
Express server
(server.mjs) — a second, separate HTTP server,
not the Connect API itself. Your browser talks to it at
http://localhost:8083 (or wherever you deploy the
sample); it is this server, not the browser, that then calls
the real endpoints in
Connect API Reference with the
secret key. Writing your own backend means implementing your
own version of these routes and calling
Connect API Reference directly —
not reusing this sample's paths. The one exception on this
page is Direct Connect API right below, which
calls Connect itself and bypasses this server entirely.
下面每一個 /api/* 路由都是這個 sample 自己的
Express 伺服器(server.mjs)——另一台獨立的 HTTP 伺服器,不是
Connect API 本身。你的瀏覽器連的是
http://localhost:8083(或你部署 sample
的位置);接著呼叫Connect API 參考裡真正端點、並帶上 secret
金鑰的,是這台伺服器,不是瀏覽器。寫自己的後端代表要實作你自己那一版的這些路由,並直接呼叫Connect API 參考——不是重用這個 sample 的路徑。這頁唯一的例外是正下方的直接呼叫 Connect API,它會直接呼叫 Connect,完全繞過這台伺服器。
以下のすべての
/api/* ルートは、このサンプル自身の Express
サーバーです(server.mjs)——別の、独立した HTTP
サーバーであり、Connect API
そのものではありません。ブラウザが通信するのは
http://localhost:8083(またはサンプルをデプロイした場所)です。secret
キーを付けてConnect API リファレンス
の実際のエンドポイントを呼び出すのは、ブラウザではなくこのサーバーです。自分のバックエンドを書くということは、これらのルートの自分自身のバージョンを実装し、Connect API リファレンス
を直接呼び出すことを意味します——このサンプルのパスを再利用するのではありません。このページで唯一の例外がすぐ下のDirect Connect APIで、これは Connect
自体を呼び出し、このサーバーを完全に迂回します。
Direct Connect API 直接呼叫 Connect API Connect API を直接呼び出す
X-Connect-Key header; this route is not proxied
by the Express sample server. Required fields:
avatar_id and message. Optional
fields: voice_id, emotion, and
intensity.
產生單次 presentation payload。請從你的伺服器,以
secret 金鑰作為
X-Connect-Key header 直接呼叫 Connect
API;Express 範例伺服器不會代理此路由。必填欄位:
avatar_id 與 message;選填欄位:
voice_id、emotion 與
intensity。
ワンショットの presentation payload
を生成します。自分のサーバーから
secret キーを
X-Connect-Key ヘッダーとして付け、Connect API
を直接呼び出してください。このルートは Express
サンプルサーバーではプロキシされません。必須フィールドは
avatar_id と
message、任意フィールドは
voice_id、emotion、intensity
です。
curl -X POST "$CONNECT_API_BASE/presentation" \
-H "X-Connect-Key: pxc_..." \
-H "Content-Type: application/json" \
-d '{
"avatar_id": "YOUR_AVATAR_ID",
"voice_id": "YOUR_VOICE_ID",
"message": "Welcome to our hackathon demo!",
"emotion": "excitement",
"intensity": "high"
}'emotion sets the message's emotional tone and
intensity sets its strength. Together, they guide
facial-expression selection for suggested motions and act as
soft ranking signals for motion candidates. Both are optional;
when both are omitted, no facial expression is attached.
Supported emotion values: joy,
excitement, admiration,
caring, gratitude,
sadness, disappointment,
annoyance, embarrassment,
curiosity, surprise,
realization, and confusion.
Supported intensity values: low,
neutral, and high.
emotion 指定訊息的情緒,intensity
指定情緒強度。兩者會引導建議動作的臉部表情選擇,並作為動作候選的軟性排序訊號。
兩者皆為選填;若兩者皆省略,則不會附加臉部表情。支援的
emotion 值為:joy、
excitement、admiration、
caring、gratitude、
sadness、disappointment、
annoyance、embarrassment、
curiosity、surprise、
realization 與 confusion;支援的
intensity 值為:low、
neutral 與 high。
emotion はメッセージの感情、intensity
はその強さを指定します。両者は提案モーションの表情選択を導き、モーション候補のソフトなランキングシグナルとしても使われます。どちらも任意で、両方を省略すると表情は付与されません。対応する
emotion の値は joy、
excitement、admiration、
caring、gratitude、
sadness、disappointment、
annoyance、embarrassment、
curiosity、surprise、
realization、confusion です。
intensity の値は low、
neutral、high です。
Health & Config 健康檢查與設定 ヘルスチェックと設定
200. Response:
{ status: "ok", upstream: "reachable" | "unreachable"
}. Probes the upstream API on every call.
存活檢查與上游診斷。始終回傳 200。回應:{ status: "ok", upstream: "reachable" | "unreachable"
}。每次呼叫都會探測上游 API。
稼働状況と上流診断。常に
200 を返します。レスポンス:{ status: "ok", upstream: "reachable" | "unreachable"
}。毎回上流 API にプローブを実行します。
{ mock: boolean, chat: boolean, presenterUrl: string
}. No upstream probe — cheap to call.
chat reflects presence of
LLM_API_KEY only, never the key itself.
靜態的每個程序標誌。回應:{ mock: boolean, chat: boolean, presenterUrl: string
}。不探測上游——可低成本呼叫。chat 僅反映
LLM_API_KEY 的存在,不包含金鑰本身。
プロセスごとの静的フラグ。レスポンス:{ mock: boolean, chat: boolean, presenterUrl: string
}。上流探索なし——低コストで呼び出せます。chat は
LLM_API_KEY
の存在のみ反映し、キー自体は返しません。
Connect Key
{ connect_key: string }. Pass it
directly into
presenter.initializeWithConnectKey(connectKey, { avatarId,
                    sceneId, voiceId })
. This is never PERXONA_CONNECT_SECRET_KEY —
that one carries chat and chatbot management, which no browser
should hold. Cache-Control: no-store. Returns
501 in mock mode, where there are no keys to
serve.
把 publishable 金鑰交給瀏覽器。回應:{ connect_key: string }。直接傳入
presenter.initializeWithConnectKey(connectKey, { avatarId,
sceneId, voiceId })。這永遠不會是
PERXONA_CONNECT_SECRET_KEY——那把能對 chatbot
說話並管理它們,不該讓任何瀏覽器持有。Cache-Control: no-store。mock 模式下沒有金鑰可提供,回傳 501。
publishable
キーをブラウザに渡します。レスポンス:{ connect_key: string }。これを直接
presenter.initializeWithConnectKey(connectKey, { avatarId,
sceneId, voiceId })に渡します。これが
PERXONA_CONNECT_SECRET_KEY
になることはありません——そちらは chatbot
との会話と管理ができ、ブラウザが持つべきものではありません。Cache-Control: no-store。mock モードでは配信するキーがないため
501 を返します。
Catalog 目錄 カタログ
Page { items: [{ id, name, thumbnail_urls, … }] }. (id is normalized from the upstream
avatar_id.)
列出 Avatar。回應:Page { items: [{ id, name, thumbnail_urls, … }] }。(id 從上游的
avatar_id 正規化。)
アバター一覧。レスポンス:Page { items: [{ id, name, thumbnail_urls, … }] }。(id は上流の
avatar_id から正規化されています。)
lod_urls,
lipsync_configs, etc.).
Avatar 詳細資訊(原始格式,含 lod_urls、lipsync_configs
等)。
アバター詳細(生形式、lod_urls、lipsync_configs
など含む)。
Page { items: […] }. Motions are a sub-resource
of an avatar — there is no top-level motions collection.
某個 Avatar 的動作。回應:Page { items: […] }。動作是 Avatar 的子資源——沒有頂層的 motions 集合端點。
アバターのモーション。レスポンス:Page { items: […] }。モーションはアバターのサブリソースです——トップレベルのモーションコレクションエンドポイントはありません。
Page { items: [{ id, name, … }] }. (id
normalized from scene_id.)
列出場景。回應:Page { items: [{ id, name, … }] }。(id 從 scene_id 正規化。)
シーン一覧。レスポンス:Page { items: [{ id, name, … }] }。(id は
scene_id から正規化。)
Page { items: [{ id, name, … }] }.
列出聲音。回應:Page { items: [{ id, name, … }] }。
音声一覧。レスポンス:Page { items: [{ id, name, … }] }。
Chatbot Chatbot チャットボット
Page { items: [{ id, name, status }] }.
列出所有 chatbot。回應:Page { items: [{ id, name, status }] }。
チャットボット一覧。レスポンス:Page { items: [{ id, name, status }] }。
{ name: string (required), custom_instructions?: string,
                    tools?: Array }
. Response:
ChatBotDetailResponse { id, name, status,
                    custom_instructions, tools }
.
建立 chatbot。請求主體:{ name: string(必填), custom_instructions?: string,
tools?: Array }。 回應:ChatBotDetailResponse { id, name, status,
custom_instructions, tools }。
チャットボットを作成します。ボディ:{ name: string(必須), custom_instructions?: string,
tools?: Array }。 レスポンス:ChatBotDetailResponse { id, name, status,
custom_instructions, tools }。
ChatBotDetailResponse (includes id,
name, custom_instructions,
status, tools).
Chatbot
詳細資訊。回應:ChatBotDetailResponse(含
id、name、
custom_instructions、status、tools)。
チャットボット詳細。レスポンス:ChatBotDetailResponse(id、name、
custom_instructions、status、tools
を含む)。
{ name?, custom_instructions?, tools? }.
Response: updated ChatBotDetailResponse.
更新 chatbot。請求主體:部分欄位
{ name?, custom_instructions?, tools? }。
回應:更新後的 ChatBotDetailResponse。
チャットボットを更新します。ボディ:部分フィールド
{ name?, custom_instructions?, tools? }。
レスポンス:更新後の
ChatBotDetailResponse。
204 No Content.
刪除 chatbot。回傳 204 No Content。
チャットボットを削除します。204 No Content
を返します。
{ filename: string, content_base64: string, mime_type?:
                    string }
. Accepted types: .txt, .pdf,
.doc, .docx, .csv (max
1 MB). The server decodes the base64 payload and forwards it
to the upstream API as multipart. Chunking and embedding run
asynchronously after this responds — the response's
knowledge.status is typically still
"processing"; poll
GET /api/chatbots/:id until it becomes
"ready" or "error".
上傳 knowledge file。請求主體:{ filename: string, content_base64: string, mime_type?:
string }。
接受格式:.txt、.pdf、.doc、.docx、.csv(最大
1 MB)。 伺服器解碼 base64 後以 multipart 格式轉發至上游
API。切割與 embedding 會在此回應之後非同步進行——回應中的
knowledge.status 通常還是
"processing";請輪詢
GET /api/chatbots/:id,直到它變成
"ready" 或 "error"。
ナレッジファイルをアップロードします。ボディ:{ filename: string, content_base64: string, mime_type?:
string }。
対応形式:.txt、.pdf、.doc、.docx、.csv(最大
1 MB)。 サーバーが base64 をデコードして multipart で上流 API
に転送します。チャンク分割と embedding
はこの応答の後に非同期で実行されます——応答の
knowledge.status は通常まだ
"processing" です。
GET /api/chatbots/:id をポーリングして
"ready" または
"error" になるまで待ってください。
{ messages: Array } — Connect parts format:
[{ role: "user", parts: [{ type: "text", text: "…" }]
                    }]
. Response: { id, status, reply_text }. Pass
reply_text to presenter.present() to
have the avatar speak it.
向 chatbot 傳送訊息。請求主體:{ messages: Array }——Connect parts 格式:
[{ role: "user", parts: [{ type: "text", text: "…" }]
                    }]
。 回應:{ id, status, reply_text }。將
reply_text 傳入
presenter.present() 讓 avatar 發話。
チャットボットにメッセージを送信します。ボディ:{ messages: Array }——Connect parts 形式:
[{ role: "user", parts: [{ type: "text", text: "…" }]
                    }]
。 レスポンス:{ id, status, reply_text }。reply_text
を
presenter.present()
に渡してアバターに発話させます。
Chat
{ messages: Array } (OpenAI message format).
Returns 501 until LLM_API_KEY is
set. Returns 400 if messages is
empty or absent.
可選的 LLM 聊天。請求:{ messages: Array }(OpenAI 訊息格式)。在設定 LLM_API_KEY 前回傳
501。若 messages 為空或缺失則回傳
400。
オプションの LLM チャット。リクエスト:{ messages: Array }(OpenAI メッセージ形式)。LLM_API_KEY
が設定されるまで 501 を返します。messages
が空または欠如の場合は 400。
docs/openapi.yaml inside the sample directory.
For TypeScript presenter types, install
@perxona/presenter-types@latest.
完整合約:上方列出的是 Express demo 的 proxy
API。如需 Connect API 本身精確的欄位格式與 schema,請參考
sample 目錄下的 OpenAPI
spec:docs/openapi.yaml。如需 TypeScript
presenter 型別,請安裝
@perxona/presenter-types@latest。
完全なコントラクト:上記は Express demo
のプロキシ API です。Connect API
を直接呼び出す場合の正確なフィールド形式とスキーマは、sample
ディレクトリ内の OpenAPI spec docs/openapi.yaml
を参照してください。TypeScript の presenter 型は
@perxona/presenter-types@latest
をインストールしてください。
Known Limitations
- Sample, not production. Demonstrates the happy path — not hardened, scaled, or feature-complete compared to the full API.
-
Shared credential model. All browser visitors
share one Connect identity (the two keys in
.env). Fine for demos; not a multi-tenant production design. -
A refused key is reported, not recovered — at startup, in
Embed's case.
Studio listens for
CONNECT_KEY_REJECTEDfor the whole session and says so on the page. Embed only catches a rejection during its own startup — logged to console, no widget rendered — and never registers the listener, so a key revoked mid-session goes unnoticed: the widget stays on screen, silent. Neither retries a rejection it does catch, because a key that was revoked, expired, restricted to other domains, or never granted the scope fails the same way every time — reissue it in the console and launch again. -
Chat is opt-in.
POST /api/chatreturns501untilLLM_API_KEYis set in.env. - Minimal UI. Intentionally framework-free vanilla JS — designed for readability, not production polish.
已知限制
- 範例,非生產環境。展示正常路徑——與完整 API 相比,未經強化、擴展或功能完整。
-
共享憑證模型。所有瀏覽器訪客共用同一個
Connect 身份(
.env裡的那兩把金鑰)。適合 Demo;不適合生產環境的多租戶設計。 -
金鑰被拒是回報,不是恢復——對 Embed
而言,只有啟動當下才算。Studio 在整個 session 期間都監聽
CONNECT_KEY_REJECTED並顯示在畫面上。Embed 只在自己啟動的當下才會接住拒絕——寫進 console、不渲染 widget——之後就不再註冊這個監聽器,所以 session 中途金鑰被撤銷不會有任何反應:widget 留在畫面上,沒有聲音。對於它確實接住的拒絕,兩者都不重試——已撤銷、已過期、限定了其他網域,或從未被授予權限的金鑰,每次都會以同樣方式失敗。請到 console 重新建立,再啟動一次。 -
聊天為可選功能。
POST /api/chat在.env中設定LLM_API_KEY之前回傳501。 - 極簡 UI。刻意使用無框架的原生 JS——設計為可讀性優先,非生產就緒。
既知の制限
- サンプル、本番環境ではありません。ハッピーパスを示すもの——完全な API と比べて堅牢化・スケール・機能完備はされていません。
-
共有認証情報モデル。すべてのブラウザ訪問者が
1 つの Connect ID(
.env内の 2 つのキー)を共有します。デモには適していますが、本番のマルチテナント設計には不向きです。 -
拒否されたキーは報告されるだけで、回復はしません——Embed
に限っては、起動時だけです。Studio はセッション中ずっと
CONNECT_KEY_REJECTEDを監視してページに表示します。Embed は自身の起動時に発生した拒否だけを捕まえます——コンソールに出力し widget を描画しません——それ以降はこのリスナーを登録しないため、セッション途中でキーが失効しても何も起きません:widget は画面に残ったまま、無音になります。実際に捕まえる拒否については両方ともリトライしません——失効・期限切れ・他ドメインへの限定・スコープ未付与のキーは毎回同じように失敗するからです。コンソールで再発行してから、もう一度起動してください。 -
チャットはオプション。
POST /api/chatは.envにLLM_API_KEYが設定されるまで501を返します。 - 最小限の UI。意図的にフレームワークなしのバニラ JS——可読性を優先した設計で、本番向けではありません。
Troubleshooting
疑難排解
トラブルシューティング
Server exits immediately: "PERXONA_API_BASE_URL is required", or a message naming one of the two Connect API keys 伺服器立即退出:"PERXONA_API_BASE_URL is required",或一則指名兩把 Connect API 金鑰其中一把的訊息 サーバーが即座に終了:"PERXONA_API_BASE_URL is required"、または 2 つの Connect API キーのいずれかを名指しするメッセージ
You haven't created .env or left a required
value blank. Both keys are required — one is
not enough, and the message names the one you left out. Run
cp .env.example .env and fill in the API base URL
and the two keys you created in the console. If your
.env still holds
PERXONA_CONNECT_EMAIL/PERXONA_CONNECT_PASSWORD, the message will say
so: that mode was removed, and this sample now authenticates
with API keys only.
你尚未建立 .env
或必填值為空白。兩把金鑰都要——只有一把不夠,訊息會指出你漏了哪一把。執行
cp .env.example .env,填入 API 基底 URL 與你在
console 建立的兩把金鑰。若你的 .env 仍留著
PERXONA_CONNECT_EMAIL/PERXONA_CONNECT_PASSWORD,訊息會告訴你:那個模式已經移除,這個
sample 現在只以 API 金鑰認證。
.env
を作成していないか、必須の値が空白です。両方のキーが必要です——片方だけでは足りず、メッセージが不足している方を名指しします。cp .env.example .env
を実行し、API ベース URL とコンソールで作成した 2
つのキーを入力してください。.env にまだ
PERXONA_CONNECT_EMAIL/PERXONA_CONNECT_PASSWORD
が残っている場合はその旨が表示されます:そのモードは削除され、このサンプルは
API キーのみで認証します。
Catalog fails to load — status shows 401 or
403
目錄載入失敗——狀態顯示 401 或
403
カタログの読み込みが失敗——ステータスが
401 または 403 を表示
Three things do this, in rough order of likelihood. The
secret key was revoked or has expired. It has
an allowed-domain list configured — a
server-to-server request sends no Origin, so
every call is refused, and the error says only that the origin
is not allowed — it never names one, so do not go looking for
a hostname in it; leave that list empty on the secret key. Or
PERXONA_API_BASE_URL points at the wrong region.
The wrong key type is not one of them by itself:
reading the catalog needs only permissions both types carry,
so a publishable key in
PERXONA_CONNECT_SECRET_KEY usually still loads
the catalog fine — unless that publishable key also has an
allowed-domain list set, which this handbook tells you to do
before shipping. In that case the swap lands a
domain-restricted key where a server-to-server call never
sends an Origin, and every call fails with the
exact reason above. Check the two variables were not swapped
before you touch either key's domain list — emptying it would
make the symptom disappear while leaving an unrestricted
secret key in the browser. Check
GET /api/health — the upstream field
shows reachability.
有三種可能,依常見程度排序。secret
金鑰已撤銷或已過期。它設了允許網域——伺服器對伺服器的請求不會送出
Origin,所以每次呼叫都被拒絕,而錯誤訊息只會說
origin
不被允許、不會指名任何一個,所以別在訊息裡找主機名稱;secret
金鑰的那份清單請留空。或者
PERXONA_API_BASE_URL
指向錯誤的區域。金鑰型別放錯本身不在其中:讀取
catalog 只需要兩種型別都具備的權限,所以把 publishable
金鑰放進
PERXONA_CONNECT_SECRET_KEY
通常還是讀得到 catalog——除非那把 publishable
金鑰本身也設了允許網域(這正是本手冊教你上線前該做的事)。這種情況下,對調會讓一把設了網域限制的金鑰跑到伺服器對伺服器呼叫的位置,而這類呼叫從不送出
Origin,於是每次呼叫都會用上面同一個理由被拒絕。動網域清單之前,先確認兩個變數沒有被對調——清空清單只會讓症狀消失,卻讓一把沒有網域限制的
secret 金鑰留在瀏覽器裡。檢查
GET /api/health——upstream
欄位顯示可連線性。
考えられるのは 3 つで、可能性の高い順に並べます。secret
キーが失効または期限切れ。許可ドメインが設定されている——サーバー間リクエストは
Origin
を送らないため、すべての呼び出しが拒否されます。エラーは
origin
が許可されていないとしか言わず、具体名は出しません。メッセージの中にホスト名を探さないでください。secret
キーのそのリストは空にしてください。または
PERXONA_API_BASE_URL
が誤ったリージョンを指しています。キーのタイプ間違いはそれ単体では原因になりません:カタログの読み取りに必要なのは両タイプが持つ権限だけなので、PERXONA_CONNECT_SECRET_KEY
に publishable
キーが入っていても、通常はカタログを問題なく読み込めます——ただし、その
publishable
キーに許可ドメインが設定されている場合は別です(これはこのハンドブックが公開前に設定するよう指示していることです)。この場合、入れ替えによってドメイン制限付きのキーがサーバー間呼び出しの位置に来てしまい、そのような呼び出しは
Origin
を送らないため、すべての呼び出しが上記と同じ理由で拒否されます。ドメインリストを触る前に、2
つの変数が入れ替わっていないか確認してください——リストを空にするだけでは症状が消えるだけで、ドメイン制限のない
secret キーがブラウザに残ったままになります。GET /api/health
を確認——upstream
フィールドで到達可能性を確認できます。
Avatar doesn't appear after clicking Launch 點擊 Launch 後 Avatar 未出現 Launch をクリックしてもアバターが表示されない
Check the browser console for errors. Common causes: the
presenter engine failed to load (CORS error — verify
PRESENTER_URL with your Perxona contact), or
initializeWithConnectKey() rejected because the
selected avatar/scene IDs don't exist in your account.
檢查瀏覽器控制台的錯誤。常見原因:presenter
引擎載入失敗(CORS 錯誤——向 Perxona 聯絡人確認
PRESENTER_URL),或
initializeWithConnectKey() 因所選 avatar/scene ID
在你的帳號中不存在而失敗。
ブラウザのコンソールでエラーを確認してください。よくある原因:presenter
エンジンの読み込み失敗(CORS エラー——PRESENTER_URL
を Perxona 担当者に確認)、または選択した avatar/scene ID
がアカウントに存在しないため
initializeWithConnectKey() が失敗した。
Avatar appears but doesn't speak Avatar 出現但不說話 アバターは表示されるがしゃべらない
Ensure resumeAudioPlayback() is called inside
the Launch button's click handler — not in a timer or after an
await that yields control back to the browser.
Browsers block autoplay triggered outside a synchronous user
gesture.
確保 resumeAudioPlayback() 在 Launch
按鈕的點擊處理器內部呼叫——不在計時器或讓出控制的
await
之後。瀏覽器會阻止在同步使用者手勢之外觸發的自動播放。
resumeAudioPlayback() が Launch
ボタンのクリックハンドラー内で呼び出されていることを確認してください——タイマーやブラウザにコントロールを戻す
await
の後ではなく。ブラウザは同期的なユーザージェスチャー外でトリガーされた自動再生をブロックします。
npm install fails with a Node version
error
npm install 因 Node 版本錯誤而失敗
npm install が Node
バージョンエラーで失敗する
This kit requires Node >=22. Run node --version. If using nvm, run
nvm use (reads .nvmrc) or
nvm install 22.
此套件需要 Node >=22。執行 node --version 確認版本。若使用 nvm,執行
nvm use(讀取 .nvmrc)或
nvm install 22。
このキットには
Node >=22 が必要です。node --version
で確認してください。nvm を使っている場合は
nvm use(.nvmrc を読み込む)または
nvm install 22 を実行してください。
Chat panel doesn't appear 聊天面板未出現 チャットパネルが表示されない
Set LLM_API_KEY in .env and restart
the server. The panel is hidden until the key is present —
GET /api/config will return
chat: true once it's set.
在 .env 中設定
LLM_API_KEY
並重新啟動伺服器。面板在金鑰存在前是隱藏的——設定後
GET /api/config 將回傳
chat: true。
.env に
LLM_API_KEY
を設定してサーバーを再起動してください。キーが存在するまでパネルは非表示です——設定後は
GET /api/config が
chat: true を返します。
Chat suddenly fails with 400 (code: 1003) or 403 (code: 14005)
聊天突然回傳 400(code: 1003)或
403(code: 14005)
チャットが突然 400 (code: 1003)または 403 (code: 14005)で失敗
Error code 1003 means your organization's
credits have been exhausted, or its
subscription itself is no longer active (check the
details field to tell which) — it is
not a bad credential or a server error. Only
metered calls (chatbot conversations via
POST /api/chatbots/:id/chat) are affected;
catalog lookups, chatbot CRUD, and presentation calls continue
to work. Sign in to
Perxona Console → Subscription
(use the region matching your account) to review your usage
and top up credits, or your plan status. A
403 (not 400) from this same chat
endpoint is a different error —
SUBSCRIPTION_NOT_ACTIVE (code: 14005), meaning the organization has no subscription context at
all — not a bad credential either, despite the status code;
the fix is the same sign-in and Subscription check
above.
錯誤碼 1003 表示你的組織 credits
已經用完,或是訂閱本身已經失效(看
details
欄位可以分辨是哪一種)——這不是金鑰問題,也不是伺服器錯誤。只有計量型呼叫(透過
POST /api/chatbots/:id/chat 的 chatbot
對話)會受影響;catalog 查詢、chatbot CRUD、presentation
呼叫照常運作。請登入
Perxona Console → Subscription
(請使用你帳號所在區域的網址)查看用量、加值,或確認方案狀態。同一個
chat endpoint 若回傳的是
403(不是
400),則是另一種錯誤——SUBSCRIPTION_NOT_ACTIVE(code: 14005),代表這個組織完全沒有訂閱
context——即使狀態碼看起來像金鑰問題,這也不是金鑰問題,處理方式一樣是登入上面的
Console 檢查 Subscription。
エラーコード 1003 は、組織の credits
が使い切られたこと、またはサブスクリプション自体が無効になっていることを意味します(どちらかは
details
フィールドで判別できます)——認証情報の問題やサーバーエラーではありません。影響を受けるのは従量制の呼び出し(POST /api/chatbots/:id/chat
によるチャットボットの会話)のみで、カタログ参照、チャットボット
CRUD、プレゼンテーション呼び出しは引き続き動作します。
Perxona Console → Subscription
にサインインして(アカウントのリージョンに対応する URL
をご利用ください)、利用量やプランの状態を確認してください。同じ
chat endpoint が 403(400
ではなく)を返す場合は別のエラーです——SUBSCRIPTION_NOT_ACTIVE
(code: 14005)で、組織にサブスクリプション
context
が全くないことを意味します——ステータスコードが認証情報の問題に見えても、これも認証情報の問題ではありません。対処法は上と同じで、Console
にサインインして Subscription を確認してください。
Next Steps
Once either demo is running, here are natural paths forward:
-
Bring your own UI. Replace the vanilla JS
frontend with React, Vue, or any framework — the server API
(
/api/*) stays unchanged. -
Handle a refused key. Listen for
CONNECT_KEY_REJECTEDand tell whoever operates the integration. There is nothing to refresh — the fix is to reissue the key in the console, so the useful thing your code can do is say so clearly. -
Bring your own model. Set
LLM_API_KEY(and optionallyLLM_PROVIDER,LLM_BASE_URL,LLM_MODEL) in.envto unlockPOST /api/chat, which enables Studio's Own LLM source. Note that the route is unauthenticated and spends whatever the key pays for — keep it onlocalhost. -
Explore the full API contract. See the
OpenAPI spec for the underlying Connect API at
docs/openapi.yamlinside the sample directory, and install@perxona/presenter-types@latestfor presenter type declarations. -
Build from Embed, not from Studio.
demos/embed/is the template — 170 lines ofapp.jsand anindex.htmlthat is mostly filler copy. Copy it, replace the layout, keep the widget. Studio is a tool rather than a starting point: 1 200 lines of catalog pickers, chatbot CRUD and a debug timeline you would spend your first hour deleting. Use it to browse the catalog and create a chatbot, pin what you chose withDEMO_FIXED_*, then build from Embed. - Follow updates and contribute. Star and watch the repository below to track new features and bugfixes.
後續步驟
任一 demo 運行後,以下是自然的進一步方向:
-
使用你自己的 UI。用 React、Vue
或任何框架取代原生 JS 前端——伺服器
API(
/api/*)保持不變。 -
處理被拒的金鑰。監聽
CONNECT_KEY_REJECTED並告訴實際維運這個整合的人。沒有東西可以刷新——真正的修法是到 console 重新建立金鑰,所以你的程式碼能做的最有用的事,是把這件事講清楚。 -
自備語言模型。在
.env中設定LLM_API_KEY(及可選的LLM_PROVIDER、LLM_BASE_URL、LLM_MODEL)以解鎖POST /api/chat,Studio 的 Own LLM 來源即可使用。請注意這個路由沒有身分驗證,而且會花掉這把 key 的錢——請只在localhost使用。 -
探索完整 API 合約。參考 sample 目錄下的
Connect API OpenAPI spec
docs/openapi.yaml,並安裝@perxona/presenter-types@latest取得 presenter 型別宣告。 -
從 Embed 開始做,不要從 Studio。
demos/embed/是模板——170 行的app.js,加上一份幾乎都是填充文案的index.html。複製它、換掉版面、留下 widget。Studio 是工具而不是起點:1200 行的 catalog 選單、chatbot CRUD 與 debug timeline,你的第一個小時會全花在刪掉它們。用它瀏覽 catalog、建立 chatbot,把選好的用DEMO_FIXED_*釘住,然後從 Embed 開始做。 - 追蹤更新並貢獻。Star 並 Watch 下方的 repository 以追蹤新功能和修復。
次のステップ
どちらかのデモが動いたら、自然な次のステップを紹介します:
-
独自の UI を使用。バニラ JS フロントエンドを
React、Vue、または任意のフレームワークで置き換えてください——サーバー
API(
/api/*)は変わりません。 -
拒否されたキーへの対応。
CONNECT_KEY_REJECTEDを監視し、この統合を運用している人に伝えてください。更新できるものはありません——本当の解決策はコンソールでキーを再発行することなので、コードにできる最も有用なことは、それをはっきり伝えることです。 -
自分のモデルを使う。
.envにLLM_API_KEY(オプションでLLM_PROVIDER、LLM_BASE_URL、LLM_MODEL)を設定するとPOST /api/chatがアンロックされ、Studio の Own LLM ソースが使えるようになります。このルートは認証がなく、そのキーの費用を消費する点に注意してください——localhostでのみ使用してください。 -
完全な API コントラクトを探索。sample
ディレクトリ内の Connect API OpenAPI spec
docs/openapi.yamlを参照し、presenter 型宣告には@perxona/presenter-types@latestをインストールしてください。 -
Studio ではなく Embed から作り始める。
demos/embed/がテンプレートです——app.jsが 170 行、index.htmlはほぼダミーのコピー。これを複製し、レイアウトを差し替え、widget だけ残してください。Studio は出発点ではなく道具です:カタログのピッカー、chatbot の CRUD、デバッグタイムラインで 1200 行あり、最初の一時間はその削除に費やすことになります。カタログの閲覧と chatbot の作成に使い、選んだものをDEMO_FIXED_*で固定してから、Embed で作り始めてください。 - アップデートをフォロー・貢献。下のリポジトリをスターしてウォッチし、新機能とバグ修正を追跡してください。
XRSPACE-Inc / perxona-connect-kit
Clone the sample, open issues, and follow updates on GitHub. 在 GitHub 上 clone 範例、提交 issue 並追蹤更新。 GitHub でサンプルをクローン、Issue を開いてアップデートをフォローしてください。